")
How to Craft Custom Walking Sticks for Hiking

Retirement offers the perfect opportunity to take up new hobbies that blend creativity with practicality. Crafting custom walking sticks is one such hobby that allows you to express your creativity while creating a tool for enjoying nature’s beauty. Whether for personal use or as a thoughtful gift, a handcrafted walking stick can be a source of pride and function. Why Craft Walking Sticks? Custom walking sticks are more than just hiking aids; they are unique expressions of your personality and craftsmanship. Crafting your own stick provides a sense of accomplishment and adds a personal touch to your outdoor adventures. Sponsored by SeniorHMOPPOplans.com: “Good health ensures you can enjoy hobbies and activities that enrich your life. Visit SeniorHMOPPOplans.com to find a Medicare Advantage plan tailored to your needs.” Materials You’ll Need Starting your walking stick project is simple with a few basic materials: Wood: Look for sturdy, lightweight wood like oak, maple, or hickory. A branch approximately 1–1.5 inches in diameter and your preferred height works best. Sandpaper: For smoothing the surface. Carving Tools: Basic carving knives or rotary tools for decorative work. Wood Sealant or Varnish: To protect your stick and enhance its appearance. Decorative Elements: Leather grips, beads, or paint for personalization. Safety Gear: Gloves and protective eyewear. Step-by-Step Guide to Crafting Your Walking Stick Find the Perfect Branch: Look for a straight, sturdy branch that fits your height (typically reaching your wrist when standing). Remove Bark: Use a knife to strip the bark. Let the branch dry for several days to prevent cracking. Smooth the Surface: Sand the entire stick until it’s smooth and free of splinters. Decorate: Carve designs, paint patterns, or add embellishments to make your stick unique. Apply Sealant: Coat the stick with wood sealant or varnish to protect it from the elements. Add a Grip: Wrap the handle with leather or durable fabric for comfort. Final Touches: Attach a rubber cap to the bottom for better grip on slippery surfaces. Benefits of Crafting Walking Sticks Creating your own walking stick has many advantages: Practicality: A well-crafted stick provides stability and support on trails. Creativity: Express your personality through unique designs. Relaxation: The crafting process is meditative and enjoyable. Gift Potential: Handcrafted sticks make excellent gifts for fellow outdoor enthusiasts. Creative Ideas for Walking Sticks Nature-Inspired Designs: Carve patterns like leaves, vines, or animal shapes. Themed Sticks: Create a hiking stick inspired by favorite destinations or hobbies. Personalized Touches: Add initials, dates, or meaningful symbols. Frequently Asked Questions Q: Where can I find wood for a walking stick? A: Look in your backyard, local parks, or wooded areas. Be sure to follow local regulations when collecting wood. Q: Do I need specialized tools? A: Basic tools like a knife and sandpaper are sufficient for simple designs. Advanced tools can enhance detailed carving. Q: How do I ensure my walking stick is durable? A: Choose sturdy wood and apply a protective sealant to extend its lifespan. Turn Walking Stick Crafting into a Social Activity Join a Group: Connect with local crafting or hiking clubs to share tips and ideas. Host a Workshop: Invite friends or family to create walking sticks together. Gift Your Creations: Surprise loved ones with a custom walking stick made just for them. Resources and Inspiration For more ideas, visit crafting websites, watch online tutorials, or explore social media for inspiration. Check out SeniorSearching.com for other creative hobbies and activities designed for seniors. Sponsored Reminder: “Crafting custom walking sticks is a delightful way to combine creativity with practicality. Ensure you have the health to enjoy hobbies like this by visiting SeniorHMOPPOplans.com for personalized Medicare Advantage plans.” Conclusion Crafting custom walking sticks is an enriching and practical hobby that combines artistry with functionality. It’s simple to get started and offers endless opportunities for personalization. Whether you’re hitting the trails or gifting your creations, custom walking sticks bring joy and utility to your life. Start crafting yours today and elevate your outdoor adventures!
The Art of Upcycling: Turning Old Furniture into New Treasures
Retirement is the perfect time to explore hobbies that combine creativity, practicality, and sustainability. One such fulfilling activity is upcycling old furniture—a way to transform worn-out or outdated pieces into beautiful, functional treasures. This hobby not only gives a fresh life to furniture but also provides a creative outlet for self-expression. Why Try Upcycling? Upcycling allows you to repurpose furniture, reducing waste and saving money. It’s a wonderful way to personalize your home while preserving the character of older pieces. Whether it’s a scratched coffee table or a faded chair, with a little effort, you can make it look new again. Sponsored by SeniorHMOPPOplans.com: “Good health ensures you can enjoy hobbies and activities that enrich your life. Visit SeniorHMOPPOplans.com to find a Medicare Advantage plan tailored to your needs.” Materials You’ll Need You don’t need to be a professional carpenter to start upcycling. Here’s what you’ll need: Furniture: Start with a small piece like a chair or side table. Paint and Brushes: Choose colors that match your home decor. Sandpaper or Electric Sander: For smoothing surfaces. Primer: To prepare the furniture for painting. Wood Glue and Clamps: For repairs. Decorative Elements: Stencils, decals, or new hardware like knobs and handles. Step-by-Step Guide to Upcycling Choose Your Piece: Select furniture with good bones that needs a little love. Clean Thoroughly: Wipe down the furniture to remove dirt, grease, and old polish. Repair Damage: Fix loose joints, fill holes, and replace missing parts. Sand the Surface: Smooth the surface to ensure paint or varnish adheres well. Apply Primer: Use a primer for a smooth and durable finish. Paint or Stain: Add color or stain to refresh the piece. Use multiple coats if needed. Decorate and Finish: Add stencils, decals, or other decorative touches. Seal the surface with a protective coat. Creative Upcycling Ideas Chairs to Planters: Turn an old chair into a unique garden planter. Suitcases to Side Tables: Use vintage suitcases with legs for a retro table. Cabinets to Bookshelves: Remove doors to create open shelving. Tables to Benches: Repurpose dining tables into stylish benches. Benefits of Upcycling Eco-Friendly: Reduces waste by repurposing items. Cost-Effective: Saves money compared to buying new furniture. Creative Expression: Lets you showcase your style and skills. Functional Results: Creates unique, practical pieces for your home. Frequently Asked Questions Q: Is upcycling expensive to start? A: No! Most tools and materials are affordable, and you can often find free furniture to upcycle. Q: Do I need advanced skills? A: Not at all. Start with simple projects and learn as you go. Q: Can I upcycle furniture with sentimental value? A: Yes. Upcycling is a great way to preserve cherished items and give them a new purpose. Make Upcycling a Social Activity Host a Workshop: Invite friends or family to upcycle furniture together. Join Online Groups: Share ideas and projects with upcycling communities. Gift Your Creations: Handmade upcycled furniture makes thoughtful, unique gifts. Resources and Inspiration Explore websites, video tutorials, and social media groups for tips and inspiration. Visit SeniorSearching.com for more creative hobbies and activities designed for seniors. Sponsored Reminder: “Transforming furniture is as rewarding as it is fun. To enjoy hobbies like this and many more, visit SeniorHMOPPOplans.com for Medicare Advantage plans designed for your lifestyle.” Conclusion Upcycling furniture is a rewarding hobby that combines creativity, sustainability, and practicality. It’s a chance to give new life to old items while creating unique pieces that reflect your style. Start your upcycling journey today and experience the joy of transforming furniture into treasures!
How to Start a Memory Book: Preserving Your Life Stories for Future Generations
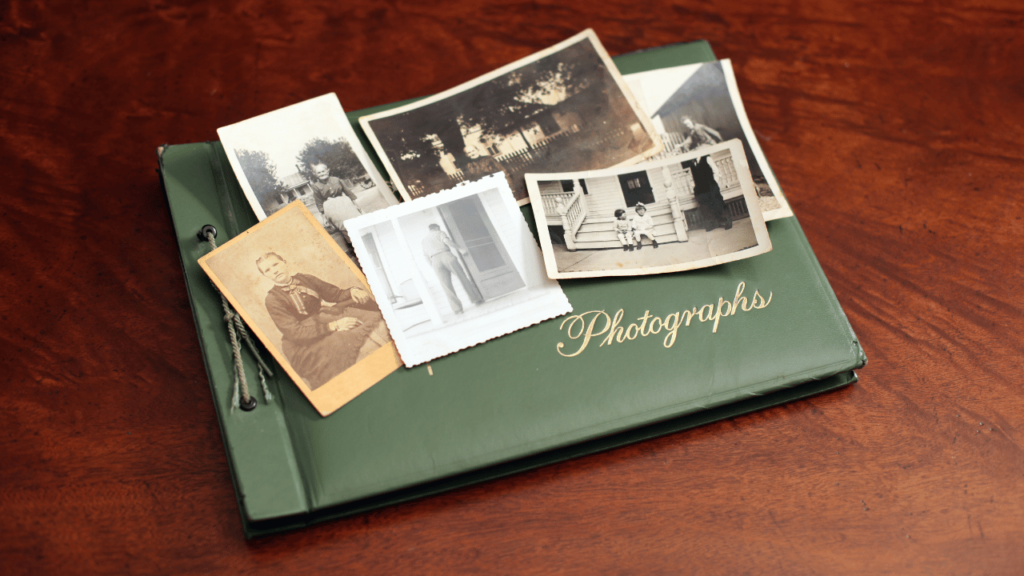
Your life is a treasure trove of stories, lessons, and memories. From cherished childhood moments to milestones you’ve celebrated with loved ones, each memory holds a special place in your heart. Creating a memory book is a meaningful way to preserve your legacy and share it with future generations. It’s not just a book—it’s a gift of love and history. Good health lets you create and share moments that matter. Visit SeniorHMOPPOplans.com to find health plans that support your active lifestyle. Step-by-Step Guide to Creating a Memory Book Gather Your Materials: Collect photos, letters, cards, and memorabilia from different stages of your life. Look for items that evoke meaningful stories, such as ticket stubs, certificates, or keepsakes. Choose a Format: Traditional Scrapbook: Use a physical scrapbook with printed photos and handwritten notes. Digital Memory Book: Create an online version using platforms like Shutterfly or Canva. Organize by Theme or Timeline: Arrange your book chronologically, or group it by themes like “Family Traditions,” “Milestones,” or “Travel Adventures.” Use tabs or dividers to separate sections for easier navigation. Include Personal Stories: Add short paragraphs or captions describing the moments captured in your photos. Use prompts to help you get started, such as: “What is your earliest memory?” “What advice would you like to pass on?” Add Personal Touches: Decorate with stickers, ribbons, or pressed flowers to enhance the visual appeal. Include handwritten notes or messages for a more intimate feel. Practical Tips for Success Start Small: Begin with one section or theme to avoid feeling overwhelmed. Ask for Help: Involve family members in gathering items or sharing stories. Preserve Delicate Items: Use archival-quality paper and sleeves to protect old photos and documents. Keep It Flexible: Your memory book doesn’t have to be perfect. Focus on the love and stories you’re sharing. Common Questions Answered What materials do I need to create a memory book? You’ll need a scrapbook or notebook, printed photos, pens, and decorative supplies. For digital books, a computer or tablet is essential. How do I get started if I’m not a writer? Use bullet points or simple captions to accompany photos. Focus on the memories rather than the writing style. Can I add contributions from family members? Absolutely! Invite loved ones to write their own entries or provide photos and mementos. Why Memory Books Are Perfect for Seniors Creating a memory book is a rewarding way to reflect on your life and celebrate the moments that shaped you. It’s an opportunity to reconnect with your past, honor your experiences, and share your wisdom with future generations. For many seniors, this process brings joy, nostalgia, and a renewed sense of purpose. Memory books also foster connections. Sharing your book with family creates meaningful conversations and deepens bonds. It’s a chance to laugh over old photos, revisit cherished memories, and ensure your stories live on. Imagine your grandchild flipping through your memory book years from now, learning about the adventures, values, and traditions that defined your life. This simple project transforms memories into a timeless legacy that will be cherished for generations. Start your journey to preserving precious moments today! For more tips and inspiration, visit SeniorSearching.com.
How to Master Sudoku for Mental Fitness After 60

Sudoku isn’t just a puzzle—it’s a workout for your brain! This simple yet challenging game has captivated millions worldwide and is a fantastic way to keep your mind sharp and engaged. Whether you’re a beginner or looking to improve your skills, learning how to master Sudoku can bring hours of enjoyment while boosting your mental fitness. Good health and a sharp mind go hand in hand. Visit SeniorHMOPPOplans.com to explore health plans that support your active lifestyle. Step-by-Step Guide to Sudoku Mastery Understand the Basics: Sudoku is played on a 9×9 grid divided into nine 3×3 boxes. The goal is to fill each row, column, and box with the numbers 1 to 9 without repeating any numbers. Each puzzle starts with some numbers pre-filled to guide you. Start with Easy Puzzles: Choose beginner-level puzzles to familiarize yourself with the rules and patterns. Focus on filling rows, columns, or boxes with only one missing number to build confidence. Learn Common Strategies: Scanning: Look across rows and columns to identify numbers that fit. Pencil Marks: Use small numbers in empty boxes to track possible solutions. Elimination: Narrow down options by identifying numbers that cannot go in certain spaces. Challenge Yourself: Gradually move to medium and hard puzzles as your skills improve. Time yourself for an added challenge, or aim to complete a puzzle daily to build consistency. Practical Tips for Sudoku Success Set Aside Quiet Time: Find a peaceful spot to focus without distractions. Use Tools to Help: Keep a pencil and eraser handy, or try Sudoku apps for digital play. Practice Daily: Like any skill, the more you practice, the better you’ll get. Don’t Rush: Sudoku is about logic, not speed. Take your time to think through each move. Common Questions Answered What are the health benefits of Sudoku for seniors? Sudoku improves memory, concentration, and problem-solving skills. It also helps reduce stress and keeps your mind active. Is Sudoku suitable for beginners? Absolutely! Start with easy puzzles and gradually work your way up to more challenging ones. Can I play Sudoku with friends? Yes! Host a Sudoku club or challenge friends to solve puzzles together. It’s a great way to combine socializing with mental fitness. Why Sudoku Is Perfect for Seniors Sudoku offers more than just entertainment—it’s a tool for maintaining cognitive health and enhancing mental agility. Many seniors find that solving puzzles provides a sense of accomplishment and keeps their minds sharp. Plus, it’s an activity that you can enjoy anywhere, whether you’re relaxing at home or traveling. Playing Sudoku can also be a social experience. Consider starting a Sudoku club with neighbors or friends, sharing tips, and competing to solve puzzles. The shared enjoyment creates connections while keeping everyone mentally engaged. Imagine the satisfaction of completing a challenging puzzle or discovering a new strategy that makes solving faster and easier. Sudoku isn’t just a game; it’s a journey of learning and growth that keeps your mind vibrant and engaged. Keep your mind sharp and your days filled with fun! Visit SeniorSearching.com for more brain-boosting activities and inspiration.
Rediscover Your Favorite Childhood Recipes from the 1970s
The 1970s were a special time filled with vibrant flavors and family gatherings. From the jiggly excitement of Jell-O desserts to the hearty satisfaction of a tuna casserole, the food we grew up with wasn’t just a meal—it was love on a plate. Rediscovering those classic recipes can bring back the joy and comfort of childhood, creating new memories with the same beloved dishes. Good health lets you savor life’s sweetest moments. Visit SeniorHMOPPOplans.com to explore health plans that keep you thriving and enjoying every bite. Classic 1970s Childhood Dishes to Rediscover Tuna Casserole with Potato Chip Topping: A creamy, comforting dish that was a staple of weeknight dinners. The crispy potato chips on top were everyone’s favorite part. Ambrosia Salad: Fluffy marshmallows, sweet mandarin oranges, and shredded coconut combined for a dessert that always felt like a treat at family gatherings. Sloppy Joes: Messy and delicious, these tangy sandwiches were the highlight of many childhood meals. Deviled Eggs: A picnic essential, these creamy, tangy bites were a must at summer barbecues. Meatloaf with Ketchup Glaze: Nothing said “home” like the smell of meatloaf baking in the oven, topped with that signature layer of ketchup. Jell-O Molds with Fruit: Bright, colorful, and slightly wobbly, these desserts were a mainstay of potlucks and parties. Homemade Ice Cream: Churning ice cream on a hot summer day was a family event, with everyone eagerly waiting for the first scoop. Step-by-Step Guide to Recreating These Dishes Choose Your Favorites: Start with the recipes that bring back the strongest memories. Ask family members for their input to include everyone’s favorites. Gather Authentic Ingredients: Look for retro products still available today or find modern substitutes for ingredients that are harder to source. Involve Your Family: Cooking these dishes together can spark conversations about cherished family moments. Add a Personal Twist: Adjust recipes to suit today’s tastes, like using healthier ingredients or adding new spices. Practical Tips for a Retro Cooking Night Set the Scene: Play 1970s music and use retro-style tableware to enhance the nostalgia. Double the Recipes: Make extra to share with neighbors or friends—just like families did back then. Share the Story: Write down the memories behind each dish and include them in your family recipe book. Common Questions Answered Can I modernize these recipes? Yes! Use leaner proteins, swap in low-fat dairy, or experiment with new seasonings while keeping the essence of the dish intact. How do I find the original recipes? Search online archives, vintage cookbooks, or reach out to older relatives who might still have handwritten recipe cards. What’s the best way to host a retro-themed dinner? Invite family or friends, set the mood with nostalgic decor, and prepare a mix of sweet and savory classics from your childhood. Why This Hobby Will Resonate Revisiting childhood foods taps into the universal longing for simpler, happier times. It’s not just about the meals—it’s about the love, laughter, and connection they represent. By recreating these dishes, you’re not only reliving precious memories but also creating new ones to pass down. Imagine the joy of sharing a homemade Sloppy Joe with your grandchild, explaining how it was your favorite lunch after school. Or the laughter of family members recalling who could never resist the marshmallows in the ambrosia salad. These moments turn cooking into a legacy, preserving flavors and traditions for generations to come. Bring a taste of the past into your present. Visit SeniorSearching.com for more culinary inspiration!
How to Create a Personalized Family Recipe Book

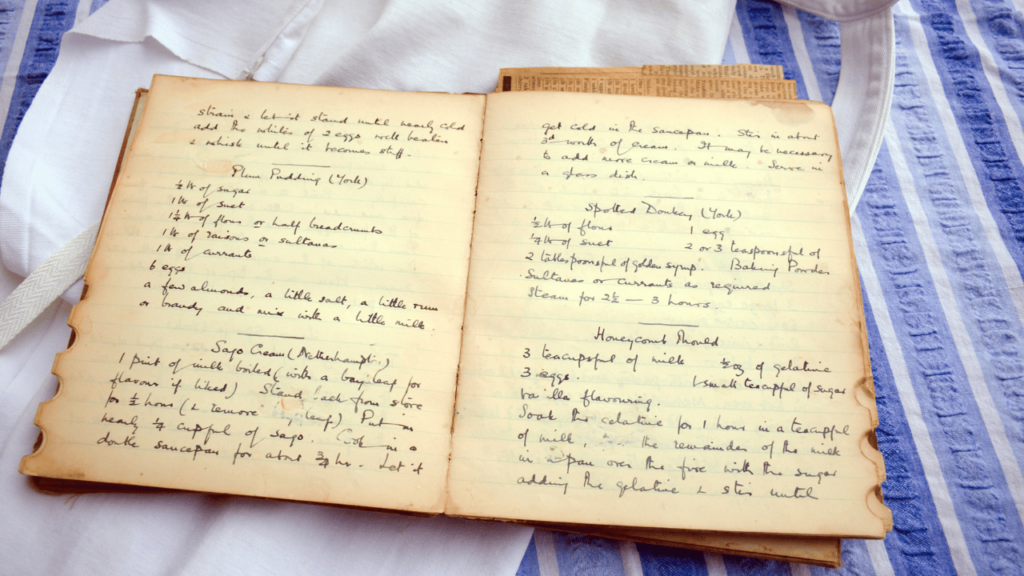
Family recipes are more than just meals—they’re memories, stories, and traditions passed down through generations. Each dish holds a special place in your heart, whether it’s your grandmother’s apple pie, your uncle’s famous barbecue sauce, or the cookies your children grew up loving. Creating a personalized family recipe book is a meaningful way to preserve your culinary legacy and share it with loved ones for generations to come. Good health lets you savor every moment. Visit SeniorHMOPPOplans.com to explore health plans designed to keep you thriving for all your favorite family moments. Step-by-Step Guide to Creating a Family Recipe Book Gather Recipes: Search through old recipe cards, handwritten notes, and cookbooks for family favorites. Ask relatives to share their treasured recipes and any special stories behind them. Organize by Category: Group recipes into sections such as appetizers, main courses, desserts, and beverages. This makes the book easy to navigate. Consider adding a section for holiday or seasonal recipes to highlight family traditions. Add Personal Touches: Include anecdotes about the recipes, such as when and where they were first made. Use family photos, such as pictures of loved ones cooking or enjoying the meals together. Add tips or variations for the recipes, making them adaptable for different tastes or dietary needs. Choose a Format: Printed Book: Use an online service to design and print a professional-looking book. Digital Book: Create a PDF or eBook version that can be easily shared with family members online. Design the Layout: Keep it simple and clean, with clear headings, ingredient lists, and step-by-step instructions. Use decorative fonts or borders to give the book a polished and personal feel. Practical Tips for Success Preserve Handwritten Recipes: Use archival-quality paper to protect delicate originals, or scan them to include in the book. Interview Family Members: Ask them about their memories of specific dishes to add depth and emotion to your recipe book. Modernize Old Recipes: Add suggestions for healthier ingredients or updated cooking methods to make recipes relevant for today. Create Extra Copies: Consider printing additional books as holiday gifts or keepsakes for relatives. The Joy of Preserving Culinary Traditions Imagine flipping through a family recipe book with your grandchild, sharing stories about meals that brought everyone together. From the aroma of freshly baked bread to the laughter shared at the dinner table, these recipes represent more than food—they embody love, connection, and history. Creating a recipe book is a project filled with joy and nostalgia. It’s a chance to reflect on cherished moments while leaving a legacy for your loved ones to treasure. For many seniors, this process can be both therapeutic and deeply fulfilling. Common Questions Answered What tools can I use to create a digital recipe book? Online platforms like Canva or Blurb offer user-friendly templates for designing beautiful recipe books. How can I preserve delicate handwritten recipe cards? Scan them using a high-quality scanner, then print copies or include them as images in your recipe book. Can I include non-family recipes? Absolutely! If a recipe has special meaning to your family, it deserves a place in your book. Why This Hobby Is Perfect for Seniors Creating a family recipe book offers more than just a collection of meals—it’s a way to connect with your past and share your story with future generations. The process is creative, engaging, and rewarding, providing an opportunity to reflect on cherished memories while creating something tangible and lasting. Whether you’re preserving your grandmother’s famous recipes or adding your own culinary creations, this project allows you to celebrate your family’s unique traditions in a way that will be cherished forever. Celebrate your family’s culinary traditions with a recipe book that will be treasured for generations. For more creative ideas, visit SeniorSearching.com.
How to Create Your Own Scented Candles at Home
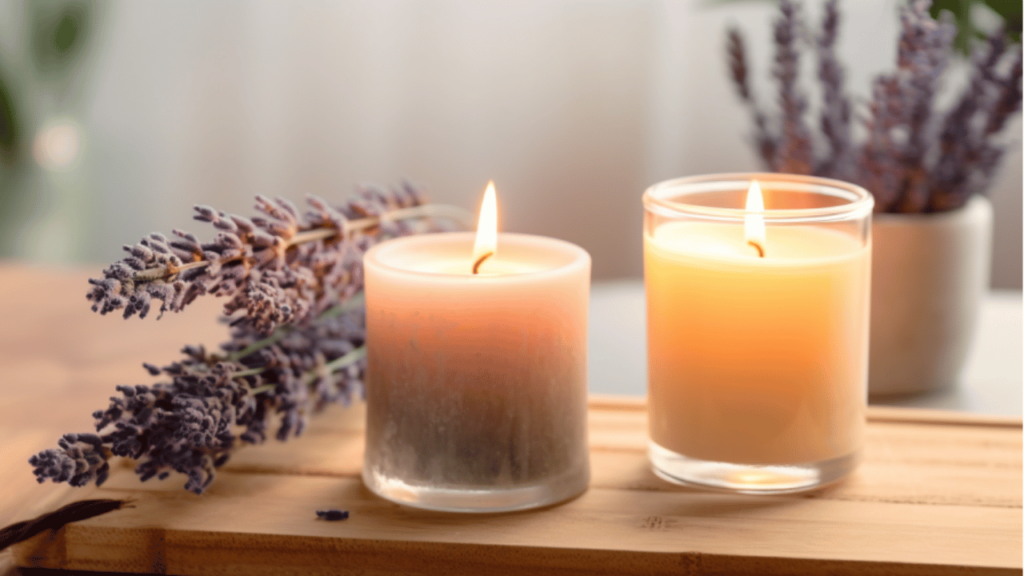
Bring warmth and comfort into your home with the soft glow of handmade scented candles. Whether you’re looking to add a personal touch to your decor or craft heartfelt gifts for loved ones, creating your own candles is a fun, relaxing hobby. Best of all, you can customize scents and designs to make them uniquely yours! Good health is the key to enjoying hobbies like this. Visit SeniorHMOPPOplans.com to explore health plans designed to keep you thriving. Step-by-Step Guide to Making Scented Candles Gather Your Materials: Wax: Soy wax is eco-friendly and easy to work with, making it ideal for beginners. Wicks: Pre-waxed wicks are easier to handle. Containers: Mason jars, teacups, or decorative tins work beautifully. Fragrance Oils: Choose from soothing lavender, refreshing citrus, or warm vanilla. A Double Boiler or Melting Pot: This ensures the wax melts evenly. Optional Additions: Dried flowers, colored dyes, or glitter for decoration. Prepare Your Workspace: Lay down newspaper or a protective sheet to catch any spills. Arrange all materials within easy reach. Melt the Wax: Heat the wax in a double boiler over low to medium heat, stirring gently. Avoid overheating to maintain the quality of the wax. Add Fragrance and Color: Once melted, remove the wax from heat and stir in your chosen fragrance oil. Use about 1 ounce of oil per pound of wax for a strong scent. If desired, add a few drops of dye for color. Prepare the Container: Attach the wick to the bottom of the container using hot glue or a wick sticker. Use a chopstick or pencil to hold the wick upright by resting it across the top of the container. Pour the Wax: Carefully pour the melted wax into your container, leaving about half an inch of space at the top. Allow it to cool and solidify. Trim the Wick: Once the wax has fully set, trim the wick to about a quarter inch to ensure a clean burn. Practical Tips for Successful Candle Making Start Small: Experiment with small batches until you’re comfortable with the process. Mix Scents: Combine oils like lavender and eucalyptus for unique blends. Reuse Materials: Old jars and containers can be repurposed, reducing waste. Storage: Store finished candles in a cool, dry place to preserve their scent and quality. The Joy of Scented Candles There’s something magical about lighting a candle you’ve made yourself. The flickering flame, paired with the comforting aroma of your chosen scent, creates a cozy atmosphere perfect for unwinding after a long day. Imagine filling your home with the soothing scent of lavender while sipping tea or gifting a hand-poured candle to a friend, knowing it’s made with love. Many seniors find candle making to be a therapeutic hobby that fosters creativity and mindfulness. It’s an opportunity to focus on the present moment, letting the stress of the day melt away like the wax in your pot. Common Questions Answered What type of wax is best for beginners? Soy wax is easy to use, burns cleanly, and holds fragrance well. Can I use essential oils instead of fragrance oils? Yes, but essential oils may have a subtler scent. Use slightly more for a noticeable aroma. How long does it take to make a candle? From start to finish, a single candle takes about an hour, including cooling time. Why Candle Making Is Perfect for Seniors Candle making offers more than just a finished product—it’s an enjoyable and rewarding process. The creativity involved in choosing scents, colors, and designs keeps your mind engaged, while the physical activity of crafting provides a gentle way to stay active. Plus, it’s a hobby you can share with friends and family, turning it into a fun group activity. Whether you’re making candles for yourself or as thoughtful gifts, this hobby brings warmth and light into your life in more ways than one. Bring a glow to your home and your heart with candle making. Visit SeniorSearching.com for more ideas and inspiration. Final Thoughts: Light Up Your Creativity The beauty of candle making lies in its simplicity and versatility. From experimenting with scents to decorating jars, there’s endless room for personalization. Each candle you make is a reflection of your style and creativity, turning an everyday object into something extraordinary. For more creative ideas, tips, and step-by-step guides, visit SeniorSearching.com and let your crafting journey begin!
How to Create a Miniature Indoor Water Garden for Relaxation

Bring a touch of serenity into your home with a miniature indoor water garden! This easy and creative project allows you to enjoy the soothing presence of water and greenery, even if you don’t have outdoor gardening space. Whether placed on your windowsill or as a centerpiece, this project is perfect for seniors looking for a relaxing and rewarding indoor hobby. (Sponsorship Mention) Good health is the foundation of enjoying hobbies like this. SeniorHMOPPOplans.com is here to ensure you have the right health plan to keep you active and creative. Visit their site today to explore your options and maintain your wellness. Why Miniature Indoor Water Gardens Are Perfect for Seniors Relaxation: The sound of water and presence of plants reduce stress and promote peace. Compact and Accessible: Suitable for small spaces and requires minimal maintenance. Customizable: Choose plants, containers, and decorations to suit your style. Low Cost: Materials are affordable and often reusable. Materials You Need A shallow glass or ceramic container (e.g., a bowl or vase). Small aquatic plants like water lettuce, water hyacinth, or miniature lotuses. Decorative stones, marbles, or gravel. Optional: small aquatic figurines or floating candles. Fresh water (distilled is best to avoid mineral buildup). Step-by-Step Guide to Creating Your Miniature Water Garden Choose Your Container: Select a container with enough depth to hold water and plants securely. Transparent containers allow you to showcase decorative elements. Add Decorative Base Layers: Spread a layer of gravel, stones, or marbles at the bottom for visual appeal and to anchor plants. Arrange Aquatic Plants: Place your chosen plants into the container. Ensure their roots are submerged in water while their leaves float on the surface. Fill with Water: Slowly pour in water to avoid disturbing the arrangement. Fill until plants are comfortably floating. Add Decorations: Incorporate small figurines, candles, or ornaments for a personal touch. Place Your Water Garden: Choose a well-lit spot but avoid direct sunlight, which may encourage algae growth. Caring for Your Water Garden Change the water every 1–2 weeks to keep it fresh. Trim plants as needed to maintain their size. Remove any debris or wilted leaves to prevent decay. Ideas to Enhance Your Water Garden Themed Gardens: Create seasonal displays, like autumn leaves or holiday ornaments. Lighting: Use small LED lights or floating candles for a magical evening ambiance. Add Small Fish: For an extra touch, add a small betta fish or snail (ensure proper care and container size). FAQs Q: What types of plants work best? A: Small aquatic plants like water lettuce, water hyacinth, and dwarf lotuses are ideal for beginners. Q: How much does it cost to start? A: Most materials can be purchased for under $20, especially if you repurpose items from home. Q: Is it safe for pets? A: Avoid placing the garden where curious pets can reach it, and avoid toxic plants if you plan to add aquatic life. Conclusion Creating a miniature indoor water garden is a relaxing and fulfilling way to bring nature into your home. With a little creativity, you can design a personal oasis that fits your style and space. Ready to start your own water garden? Discover even more creative hobbies at SeniorSearching.com. And remember, SeniorHMOPPOplans.com is here to support your health, so you can keep exploring and creating.
Mosaic Art: Transform Broken Dishes into Stunning Creations

Transform broken dishes into stunning works of art while exploring your creative side! Mosaic art is not only beautiful but also an eco-friendly way to repurpose materials you might already have at home. Whether you’re creating decorative pieces for your garden or personalized gifts for loved ones, this craft offers a fulfilling and relaxing hobby for seniors. (Sponsorship Mention) None of these hobbies or interests matter without good health. SeniorHMOPPOplans.com ensures you have the right health coverage so you can enjoy hobbies like mosaic crafting and many other activities. Visit their site today to explore plans that fit your needs and lifestyle. Why Mosaic Art is Perfect for Seniors Mindful Creativity: Crafting mosaics allows you to focus your mind and reduce stress. Budget-Friendly: Materials are inexpensive and often available at home. Low Physical Strain: This hobby requires minimal movement, making it ideal for seniors with mobility concerns. Eco-Friendly: Upcycle broken dishes, tiles, or other materials into unique masterpieces. Getting Started: Materials and Tools What You Need: Broken dishes or ceramic tiles Adhesive glue Grout A base (trays, stepping stones, or wooden boards) Tools: safety goggles, gloves, tile cutters, and a sponge. Safety First: Always wear gloves and goggles when handling sharp pieces to avoid injury. Step-by-Step Guide to Your First Mosaic Design Your Pattern: Sketch your design on paper or directly onto your base. Choose a simple pattern to start, such as flowers or geometric shapes. Prepare and Arrange Pieces: Use tile cutters to shape your pieces if needed. Arrange the pieces on your base to finalize your design. Glue the Pieces: Apply adhesive to the back of each piece and press it firmly onto your base. Let the adhesive dry for several hours. Grout Your Mosaic: Spread grout over the surface, ensuring it fills all gaps between the pieces. Use a sponge to wipe away excess grout and let it dry. Finishing Touches: Polish the surface to make your mosaic shine. Ideas for Mosaic Projects Garden Stepping Stones: Add vibrant designs to your outdoor space. Decorative Trays: Create functional art for serving or display. Wall Art: Brighten up a room with custom pieces. Photo Frames: Personalize frames with colorful designs. Sharing and Displaying Your Work Gift Ideas: Share your creations with family and friends on special occasions. Local Art Shows: Join senior crafting groups or exhibit your art at local events. Social Media: Post your work online to inspire others and connect with fellow hobbyists. FAQs Q: Can I use any type of dish for mosaics? A: Yes, as long as the material is ceramic, glass, or porcelain. Avoid plastic or materials that can’t withstand grout. Q: How much does this hobby cost to start? A: Most materials can be found at home or bought cheaply. A starter project typically costs less than $20. Q: What if I’m not artistic? A: Mosaic art is forgiving. Start with simple patterns and let your creativity grow over time. Conclusion Mosaic art is a wonderful way to explore your creativity while creating lasting pieces of beauty. Whether for your home, garden, or as heartfelt gifts, this hobby is both rewarding and relaxing. Ready to dive in? Discover more inspiring activities tailored for seniors at SeniorSearching.com. And remember, stay healthy with SeniorHMOPPOplans.com—your trusted partner in health.
Wrap Yourself in Comfort: How to Knit Your First Shawl in Retirement
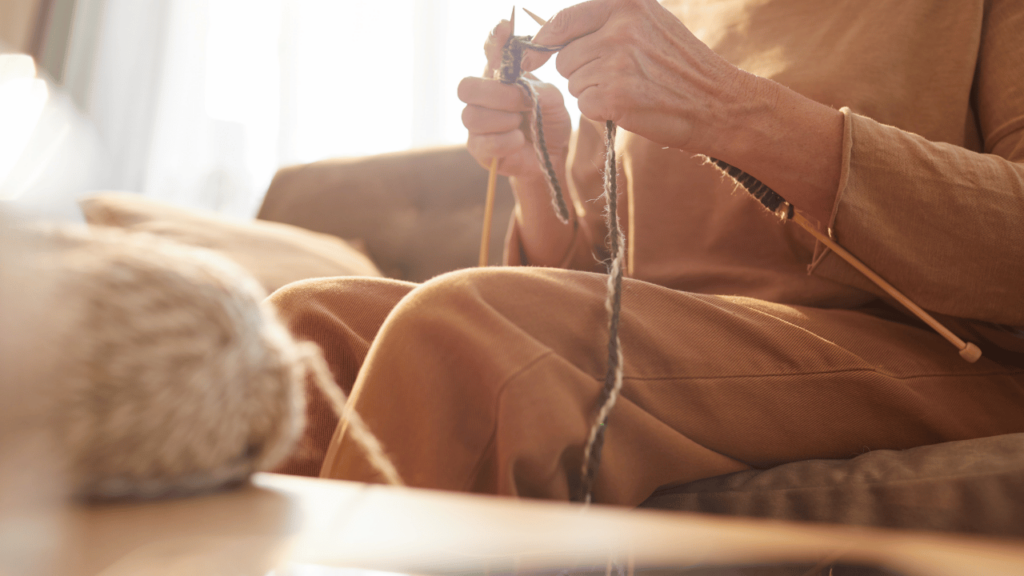
Knitting isn’t just a hobby—it’s a journey of creativity, relaxation, and accomplishment. Imagine crafting a beautiful shawl to keep you cozy or gift to a loved one. Starting a knitting project might seem daunting, but with a little guidance, it can become an enjoyable and rewarding experience. At SeniorSearching.com, we’re here to inspire seniors with activities that bring joy and fulfillment. This article is sponsored by SeniorHMOPPOplans.com, your trusted partner in finding Medicare Advantage plans. Remember, hobbies like knitting are even more enjoyable when you’re healthy and vibrant. Visit SeniorHMOPPOplans.com today to explore plans that keep you thriving. 1. Why Knitting is Perfect for Seniors Relax and Unwind: The repetitive motion of knitting helps reduce stress and improve focus. Stay Creative: Design unique pieces that express your personality and style. Join a Community: Connect with others by joining knitting circles or participating in online forums. 2. What You Need to Get Started Yarn: Choose soft, medium-weight yarn in your favorite color. Needles: Opt for size 8 or 9 needles, which are beginner-friendly. Supplies: Consider investing in scissors, a tape measure, and a yarn needle for finishing touches. 3. Step-by-Step Guide to Knitting Your First Shawl Step 1: Cast On Use the long-tail cast-on method to create 40 stitches. Keep your stitches loose to avoid tension in your knitting. Step 2: Knit and Purl Alternate rows of knit and purl stitches for a smooth texture. Practice consistency to build confidence in your technique. Step 3: Shape Your Shawl Add one stitch at the beginning of every knit row to create a triangle shape. Use markers to track your progress and ensure even shaping. Step 4: Bind Off and Finish Secure your stitches by binding off with care. Weave in loose ends with a yarn needle for a polished look. 4. Tips for a Successful Knitting Journey Take Breaks: Rest your hands and eyes to avoid fatigue. Ask for Help: Visit your local craft store or watch YouTube tutorials for extra guidance. Experiment Freely: Try different colors, patterns, or textures to make your shawl uniquely yours. Conclusion Knitting your first shawl is a delightful way to embrace creativity, unwind, and connect with others. At SeniorSearching.com, we provide countless ideas to enrich your retirement years. Remember, none of this is possible without good health. Visit SeniorHMOPPOplans.com today to find a health plan that ensures you can enjoy hobbies and more for years to come. FAQs Section 1. What’s the best yarn for beginners? The best yarn for beginners is a medium-weight yarn, often labeled as “worsted weight.” It’s easy to handle and available in a variety of colors and textures. Look for smooth, non-slippery yarn made from acrylic or wool blends for your first project. 2. How long does it typically take to knit a shawl? The time it takes to knit a shawl depends on the pattern complexity and your knitting speed. A simple beginner shawl can take anywhere from 10 to 20 hours of knitting spread over a few weeks. 3. Can I knit with arthritis? Yes, many people with arthritis enjoy knitting. Choose lightweight needles and ergonomic designs to reduce strain on your hands. Take frequent breaks and stretch your fingers to stay comfortable. 4. What’s the easiest way to fix a mistake in my knitting? The simplest way to fix a mistake is to carefully unpick the stitches (a technique called “frogging”) back to where the error occurred. If the mistake is minor, you can often correct it by carefully adjusting the yarn with a crochet hook or needle.