")
Relive the Past: A Guide to Starting Your Retro Memorabilia Collection
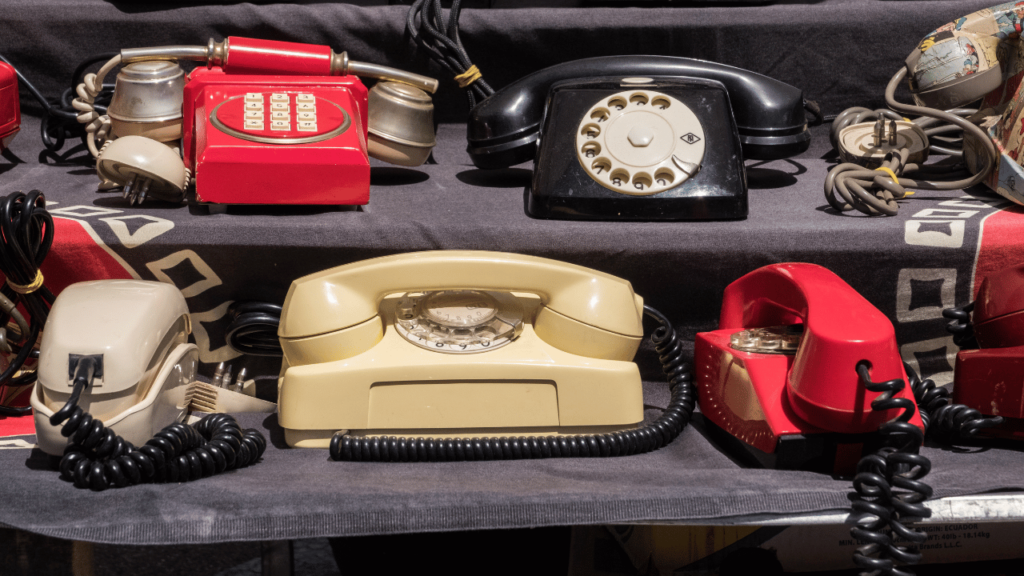
There’s something magical about holding a piece of history in your hands. Retro memorabilia not only takes you on a journey down memory lane but also becomes a rewarding hobby. Whether it’s vintage postcards, classic vinyl records, or antique toys, starting a collection can be both exciting and fulfilling. At SeniorSearching.com, we specialize in bringing seniors content that inspires and entertains. This article is proudly sponsored by SeniorHMOPPOplans.com—your trusted partner in finding Medicare Advantage plans tailored for seniors. After all, staying healthy ensures you can enjoy all the joys life has to offer, including hobbies like this one. 1. Why Collect Retro Memorabilia? Celebrate the Past: Relive cherished memories from your youth, like your favorite TV shows, music, or toys. Build Community: Connect with others who share your passion by joining local collector clubs or online forums. Discover Stories: Learn fascinating tales behind the items you collect, adding layers of meaning to your collection. 2. Popular Items to Collect Postcards and Stamps: Tiny pieces of history from around the world with captivating designs. Vinyl Records: Relive the golden age of music with records from artists who defined your generation. Antique Toys: Find treasures from your childhood, like tin cars, board games, or iconic dolls. Classic Advertisements: Collect vintage ads showcasing products from decades past. 3. Getting Started with Your Collection Where to Look: Visit flea markets, estate sales, and thrift stores. Explore online marketplaces like eBay and Etsy for rare finds. Browse local antique shops for hidden treasures. Start Small: Focus on one category, such as records or postcards, to avoid feeling overwhelmed. Research and Learn: Dive into the history of your chosen items to make informed purchases and grow your appreciation. 4. Tips for Maintaining Your Collection Organize and Display: Use shelves, shadow boxes, or albums to showcase your collection. Preserve Your Items: Protect delicate pieces with acid-free paper or cases to prevent wear and tear. Track Your Finds: Keep a journal or digital record of your collection to document your journey. Conclusion Collecting retro memorabilia is more than a hobby—it’s a way to celebrate the past, connect with others, and find joy in retirement. At SeniorSearching.com, we’re here to inspire your golden years with meaningful and engaging content. Don’t forget, good health is key to enjoying hobbies like this one. Visit SeniorHMOPPOplans.com today to explore Medicare Advantage plans designed to keep you vibrant and thriving. Move FAQs Section 1. Where can I find authentic retro memorabilia? You can find authentic retro memorabilia at flea markets, estate sales, thrift stores, and antique shops. Online marketplaces like eBay and Etsy are also excellent options, but always check seller reviews and item descriptions to ensure authenticity. 2. How do I determine the value of my items? The value of an item depends on its rarity, condition, and demand. Use online resources like auction sites or collector forums to compare prices. You can also consult price guides or work with a local appraiser for professional evaluations. 3. Are there affordable ways to start a collection? Yes, start small by focusing on one type of item, like postcards or vinyl records. Look for bargains at garage sales, thrift stores, and online auctions. Networking with other collectors can also help you find affordable treasures. 4. What’s the best way to display delicate items like postcards or stamps? For postcards or stamps, use acid-free albums or archival sleeves to prevent damage. Display your items in shadow boxes or frames with UV-protective glass to shield them from sunlight and dust. Ensure proper ventilation to avoid humidity-related issues.
How to Preserve Old Photos: A DIY Guide for Seniors
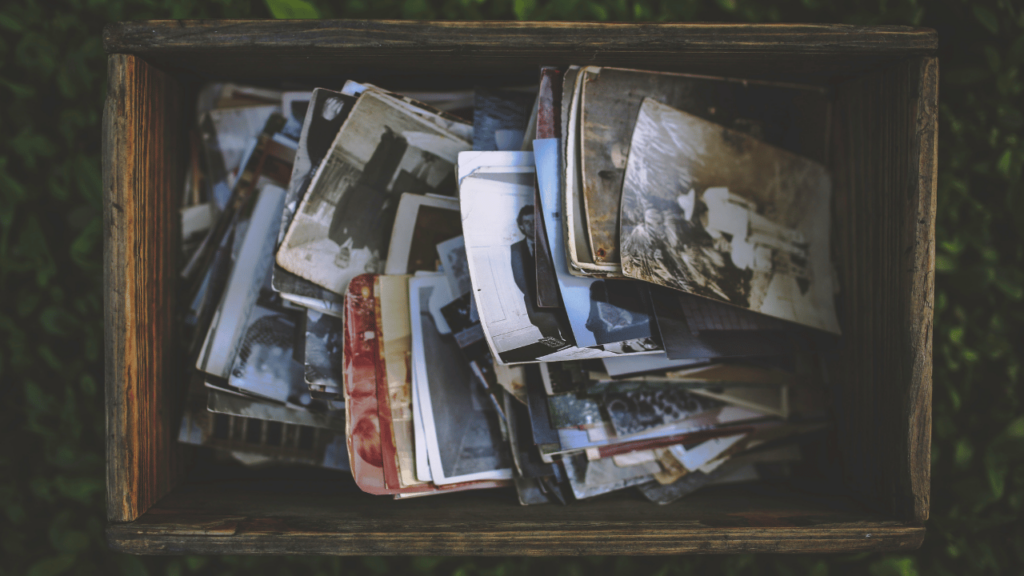
Old photos are more than just images—they’re cherished memories of family, friends, and special moments. But time can fade or damage these precious keepsakes. Preserving old photos is a meaningful way to protect your family’s history and pass it on to future generations. With a few simple tools and easy steps, you can create a lasting legacy. And just like preserving memories is important, maintaining good health ensures you can enjoy these meaningful projects. That’s why SeniorHMOPPOplans.com is here to support your well-being every step of the way. Why Preserve Old Photos? Protect Family History: Safeguard irreplaceable memories from fading or damage. Create a Legacy: Pass down beautifully organized photos to your children and grandchildren. Enjoy the Nostalgia: Relive wonderful moments as you sort through old albums. Practical and Rewarding: A hands-on project that combines creativity and purpose. How to Preserve Your Old Photos Step 1: Gather Your Supplies Acid-free photo albums or storage boxes. Archival-quality photo sleeves or envelopes. A scanner or smartphone for digitizing photos. A soft brush or cloth to gently clean prints. Step 2: Sort and Organize Arrange photos by year, event, or family member. Label the back of each photo with a soft pencil to note dates and names. Step 3: Clean and Protect Use a soft brush to remove dust and debris. Place each photo in an acid-free sleeve to prevent deterioration. Step 4: Digitize Your Collection Scan photos at a high resolution using a scanner or smartphone. Save digital copies to a cloud service or external hard drive for safekeeping. Step 5: Create a Photo Album or Digital Slideshow Compile your photos into a beautiful album with captions and stories. Use digital tools like Canva or Google Slides to create a slideshow for family gatherings. Tips for Success Handle photos by the edges to avoid smudges or damage. Use acid-free and archival-quality materials for long-term storage. Back up digital copies to multiple locations for added security. FAQs 1. Are acid-free materials necessary? Yes, they prevent yellowing and deterioration over time. 2. Can I digitize photos without a scanner? Yes! Many smartphones have apps like Google Photos or Adobe Scan for high-quality digitization. 3. How do I clean fragile photos? Use a soft, lint-free cloth or brush to gently remove dust—never use water or chemicals. Personal Story: John’s Photo Preservation Project At 64, John wanted to preserve his family’s old photos for his grandchildren. He started by organizing albums and digitizing his favorites. “It’s amazing to relive those memories,” he says. Now, his family enjoys a digital slideshow at every reunion. With the help of SeniorHMOPPOplans.com, John stays healthy and focused on this meaningful hobby. Why Your Health Matters for Meaningful Projects Engaging in activities like photo preservation brings joy and connection, but good health ensures you can enjoy these projects fully. That’s why SeniorHMOPPOplans.com helps seniors find health plans tailored to their needs. Visit SeniorSearching.com for more creative ideas and practical tips. Call-to-Action Ready to start preserving your family’s memories? Visit SeniorSearching.com for more step-by-step guides and inspiring projects designed for seniors.
How to Rediscover Handwriting: Revive the Art of Cursive Writing
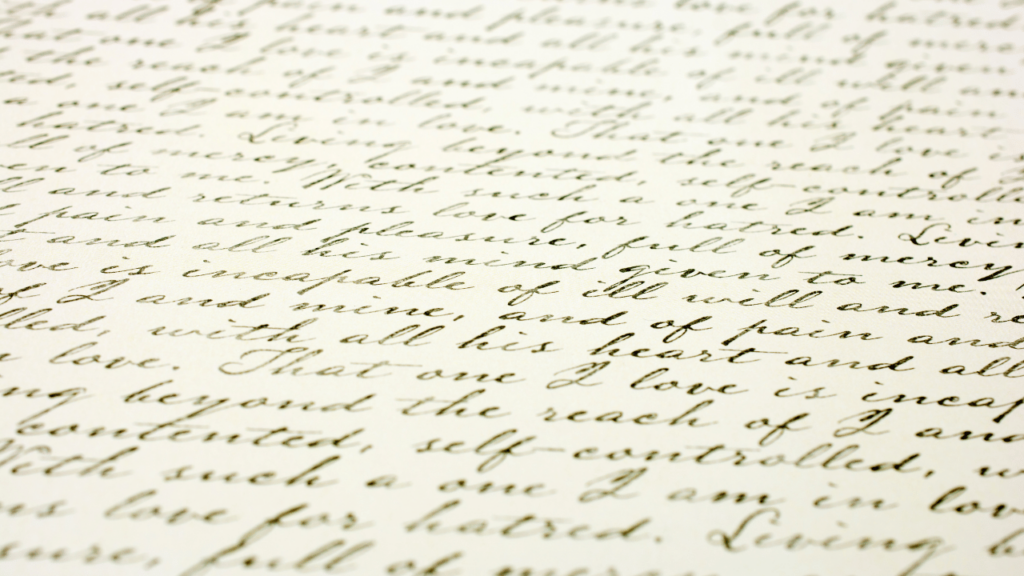
In today’s digital age, handwriting—especially cursive—has become a lost art. For many, writing by hand evokes memories of school days, heartfelt letters, and the joy of putting pen to paper. Rediscovering the beauty of cursive writing is not only nostalgic but also therapeutic. It’s a wonderful way to improve dexterity, focus, and creativity. With just a pen and paper, you can reconnect with a cherished skill and create something uniquely yours. As you embark on hobbies like this, remember that good health ensures you have the energy and focus to enjoy them. That’s why SeniorHMOPPOplans.com is here to support your well-being. Why Cursive Writing is Perfect for Seniors A Nostalgic Journey: Revive the joy of learning and practicing cursive. Therapeutic Benefits: Writing by hand can calm the mind and improve focus. Practical Skills: Enhance your handwriting for journaling, letters, or creative projects. Accessible and Low-Cost: All you need is a pen, paper, and a bit of patience. How to Relearn and Practice Cursive Writing Step 1: Gather Your Materials A notebook or lined paper for practice. A comfortable pen or calligraphy pen for smooth writing. Printed cursive practice sheets (available online for free). Step 2: Start with the Basics Practice writing the alphabet in cursive. Focus on letter forms, loops, and connections. Write each letter multiple times to build muscle memory. Step 3: Form Words and Phrases Move on to simple words like “love” or “hope.” Gradually practice longer phrases, like your favorite quotes or verses. Step 4: Incorporate into Daily Life Use cursive for grocery lists, journaling, or personal letters. Try creating a handwritten card for a friend or family member. Step 5: Challenge Yourself Experiment with creative writing, like poetry or calligraphy-style cursive. Use decorative flourishes to personalize your style. Tips for Success Set aside 15–20 minutes daily for practice. Write slowly and focus on forming each letter with care. Don’t worry about perfection—cursive is an art that grows with time. FAQs 1. Is cursive difficult to relearn? Not at all! With consistent practice, your muscle memory will come back quickly. 2. Can I use any pen? Yes, but pens with smooth ink flow (like gel or fountain pens) make the experience more enjoyable. 3. What if my handwriting isn’t neat? Cursive improves with practice, so stick with it—you’ll see progress in no time. Personal Story: Jim’s Return to Handwriting At 64, Jim missed the days when handwritten letters were the norm. He decided to rediscover cursive, starting with simple phrases. Now, he journals daily and even writes letters to his grandchildren. “It’s a relaxing way to end the day,” he says. With his health supported by SeniorHMOPPOplans.com, Jim has the focus and energy to enjoy this creative journey. Why Your Health Matters Hobbies like cursive writing bring calmness and joy, but good health ensures you can enjoy them fully. That’s why SeniorHMOPPOplans.com helps seniors find health plans that fit their needs, so they can focus on meaningful activities. Visit SeniorSearching.com for more inspiring ideas. Call-to-Action Ready to pick up a pen and rediscover cursive? Visit SeniorSearching.com for more creative guides and step-by-step hobbies designed for seniors.
Enhanced Article: How to Create DIY Aromatherapy Blends for Relaxation Introduction

Relaxation doesn’t have to be complicated. Aromatherapy, the use of essential oils for calming the mind and body, is a simple way to bring peace into your daily life. Creating your own DIY blends adds a personal touch and makes the experience even more rewarding. With a few affordable ingredients and easy steps, you’ll have custom scents tailored to your needs. While activities like this bring joy, staying healthy is the foundation of enjoying them. That’s why SeniorHMOPPOplans.com is here to ensure you’re well-supported to live your best life. Why DIY Aromatherapy Blends are Perfect for Seniors Relaxing and Therapeutic: Scents like lavender and eucalyptus help reduce stress and promote calmness. Affordable and Easy: Requires minimal tools and ingredients. Creative and Customizable: Tailor blends to your personal preferences and moods. Perfect for Gifting: Share your creations with friends and family as thoughtful, handmade presents. How to Make Your Own Aromatherapy Blends Step 1: Gather Your Supplies Essential oils (e.g., lavender, eucalyptus, peppermint, orange). A carrier oil (e.g., almond oil, coconut oil, or jojoba oil). Small glass bottles or rollerball containers. Labels or markers for identifying your blends. Step 2: Choose Your Blend Here are a few simple recipes to get started: Relaxation Blend: 10 drops lavender oil. 5 drops chamomile oil. 2 tablespoons carrier oil. Energizing Blend: 10 drops orange oil. 5 drops peppermint oil. 2 tablespoons carrier oil. Sleep Blend: 8 drops lavender oil. 4 drops cedarwood oil. 2 tablespoons carrier oil. Step 3: Mix Your Blend Add the essential oils to your glass bottle, then top with carrier oil. Close the bottle and shake gently to combine. Step 4: Apply or Diffuse For relaxation, apply to your wrists or temples. Use in a diffuser to fill the room with your blend’s calming scent. Tips for Success Always dilute essential oils with a carrier oil before applying to skin. Test a small amount on your skin to ensure you’re not allergic. Store your blends in a cool, dark place to preserve their potency. FAQs 1. Do I need special equipment? No, just a few basic items like glass bottles and carrier oils. 2. Are essential oils safe for everyone? Most people can use them safely, but always dilute and test first. 3. How long do blends last? Properly stored blends can last 6–12 months. Personal Story: Marie’s Journey with Aromatherapy At 64, Marie was searching for a way to unwind after busy days. She started making her own aromatherapy blends, and now it’s part of her daily routine. “I love experimenting with scents to match my mood,” she says. Her handcrafted blends are so popular with friends and family that she’s often asked to make extras for gifts! Staying healthy with the support of SeniorHMOPPOplans.com ensures Marie can fully enjoy this calming hobby. Why Health is Essential for Relaxation Activities like DIY aromatherapy bring calmness and joy, but staying healthy is the key to making the most of them. That’s why SeniorHMOPPOplans.com helps seniors find health plans tailored to their needs, so they can focus on relaxation and wellness. Visit SeniorSearching.com for more inspiring ideas. Call-to-Action Ready to create your first aromatherapy blend? Visit SeniorSearching.com for more wellness tips and step-by-step guides tailored for seniors.
Enhanced Article: How to Preserve Family Recipes in a DIY Cookbook

Family recipes are more than just instructions for cooking—they’re stories, memories, and connections to loved ones. Creating a DIY cookbook is a meaningful way to preserve these treasures and share them with future generations. This project is perfect for seniors looking for a creative and rewarding activity. And remember, while preserving memories is priceless, maintaining your health is essential for enjoying every moment. That’s why SeniorHMOPPOplans.com helps seniors stay active and healthy to focus on what truly matters. Why Preserve Family Recipes? A Living Legacy: Pass down cherished recipes and the memories attached to them. Creative Expression: Design a cookbook that reflects your family’s unique traditions. A Practical Gift: A homemade cookbook is a thoughtful present for children and grandchildren. Keeps You Engaged: Sorting through recipes and organizing them into a book is both fun and fulfilling. How to Create Your DIY Family Cookbook Step 1: Collect Your Recipes Gather handwritten recipe cards, old cookbooks, or family notes. Interview family members to uncover “lost” recipes or special cooking tips. Step 2: Organize Your Recipes Group recipes into categories like appetizers, main courses, and desserts. Include special sections for holiday traditions or family favorites. Step 3: Add Personal Touches Write down the stories or memories tied to each recipe. Include photos of family gatherings or meals where the recipe was featured. Step 4: Design Your Cookbook Use an online tool like Canva or a scrapbook for a handmade touch. Choose a consistent layout for recipes, photos, and personal notes. Step 5: Print and Share Print copies professionally or use a high-quality home printer. Bind the pages in a folder or spiral binding for durability. Tips for Success Test recipes as you go to ensure they’re accurate. Include cooking tips or variations to make recipes more versatile. Keep the design simple for easy reading and replicating. FAQs 1. Do I need technical skills to design a cookbook? Not at all! Online tools like Canva have user-friendly templates that make designing simple. 2. How much does it cost to create a cookbook? You can create a beautiful DIY cookbook for under $20, especially with digital tools or home printing. 3. Can I include family photos? Absolutely! Adding photos makes your cookbook more personal and meaningful. Personal Story At 64, Marie decided to create a cookbook featuring her mother’s recipes. She spent weeks gathering notes, testing dishes, and adding stories about her family’s traditions. “It was such a labor of love,” she says. Now, her cookbook is a treasured gift her grandchildren adore. Staying healthy with support from SeniorHMOPPOplans.com allows Marie to focus on meaningful projects like this. Why Health is the Key to Enjoying Family Projects Whether it’s preserving recipes or exploring new hobbies, staying healthy is essential for enjoying life’s simple joys. That’s why SeniorHMOPPOplans.com is committed to helping seniors find health plans that fit their needs, so they can stay focused on creating beautiful memories. Visit SeniorSearching.com for more inspiring ideas. Call-to-Action Ready to start your family cookbook? Visit SeniorSearching.com for more creative guides and practical tips to enrich your life.
How to Start Sculpting with Air-Dry Clay
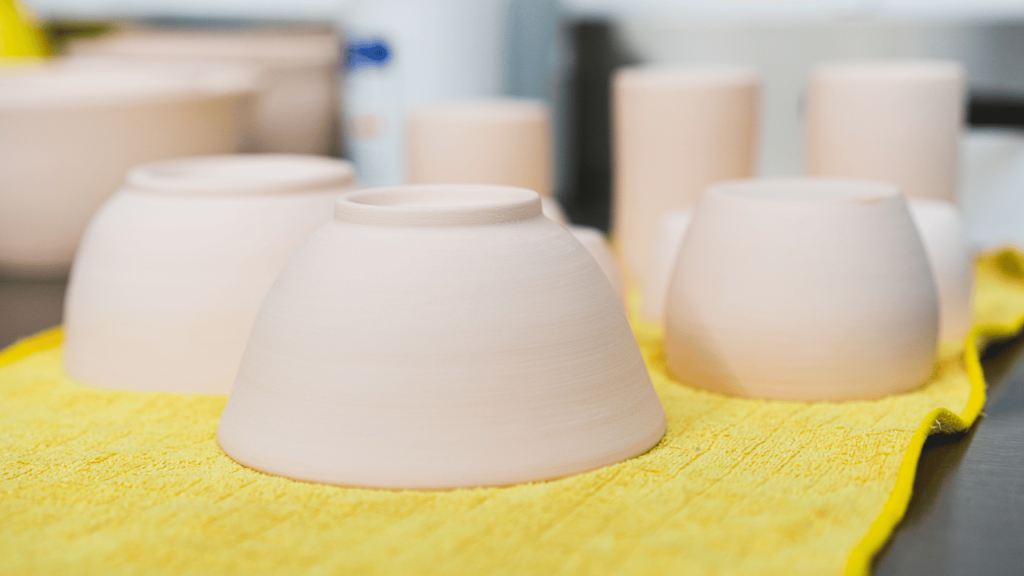
Have you ever dreamed of creating something beautiful with your hands? Sculpting with air-dry clay is the perfect hobby for seniors. It’s easy to get started, doesn’t require a kiln or expensive equipment, and offers endless possibilities for creativity. Whether you’re making small figurines, jewelry dishes, or decorative items, this relaxing activity is great for the mind and soul. And remember, good health is essential to fully enjoy hobbies like this. That’s why SeniorHMOPPOplans.com is here to help you stay vibrant and active for all your creative pursuits. Why Sculpting is Ideal for Seniors Creative Outlet: Explore your imagination and express yourself through art. Relaxing and Therapeutic: Working with clay has been shown to reduce stress and improve focus. Accessible and Affordable: Air-dry clay is budget-friendly and can be used at home without special equipment. Great for Gifting: Handmade creations make thoughtful and unique gifts for family and friends. How to Get Started with Air-Dry Clay Step 1: Gather Your Materials You’ll need just a few basics to begin: Air-dry clay (available at craft stores). Sculpting tools or household items like toothpicks, spoons, or knives. A smooth, clean surface to work on. Acrylic paint or varnish for finishing. Step 2: Choose a Simple Project Start with something easy, like: A small bowl or jewelry dish. A simple figurine. Decorative ornaments for your home. Step 3: Shape and Sculpt Knead the clay to soften it. Shape it into your desired form using your hands and tools. Smooth the surface with a bit of water to remove cracks or fingerprints. Step 4: Let It Dry Place your sculpture in a cool, dry spot for 24–72 hours. Avoid direct sunlight, which can cause cracking. Step 5: Decorate and Seal Once the clay is dry, paint it with acrylic colors or leave it natural. Use a clear varnish to seal and protect your creation. Tips for Success Keep a small bowl of water nearby to smooth edges and add moisture to drying clay. Use household items like forks or combs to create textures. Store unused clay in an airtight container to keep it soft for future projects. FAQs 1. Do I need prior experience to sculpt? No! Air-dry clay is beginner-friendly and forgiving. Start with simple shapes and build confidence as you go. 2. Can I sculpt indoors? Absolutely. All you need is a clean surface and good lighting. 3. What if my clay cracks while drying? Small cracks can be smoothed out with a damp finger or a bit of fresh clay. Personal Story Barbara, 64, discovered sculpting with air-dry clay after retiring. She started with small dishes for her grandchildren and now creates beautiful ornaments for every holiday. “It’s such a joy to see my ideas take shape,” she says. Barbara credits her hobby with keeping her mind sharp and her days full of purpose. Thanks to her health plan from SeniorHMOPPOplans.com, she has the energy and focus to enjoy every moment of it. Why Health Matters for Hobbies Creative activities like sculpting bring joy and fulfillment, but staying healthy is key to enjoying them. That’s why SeniorHMOPPOplans.com is committed to helping seniors find the right Medicare Advantage plans to keep them active and inspired. Visit SeniorSearching.com for more ideas and practical tips to enrich your life. Call-to-Action Ready to sculpt your first masterpiece? Visit SeniorSearching.com for more creative hobbies and step-by-step guides tailored for seniors.
How to Create Hand-Carved Wooden Coasters: A Simple DIY Guide for Seniors
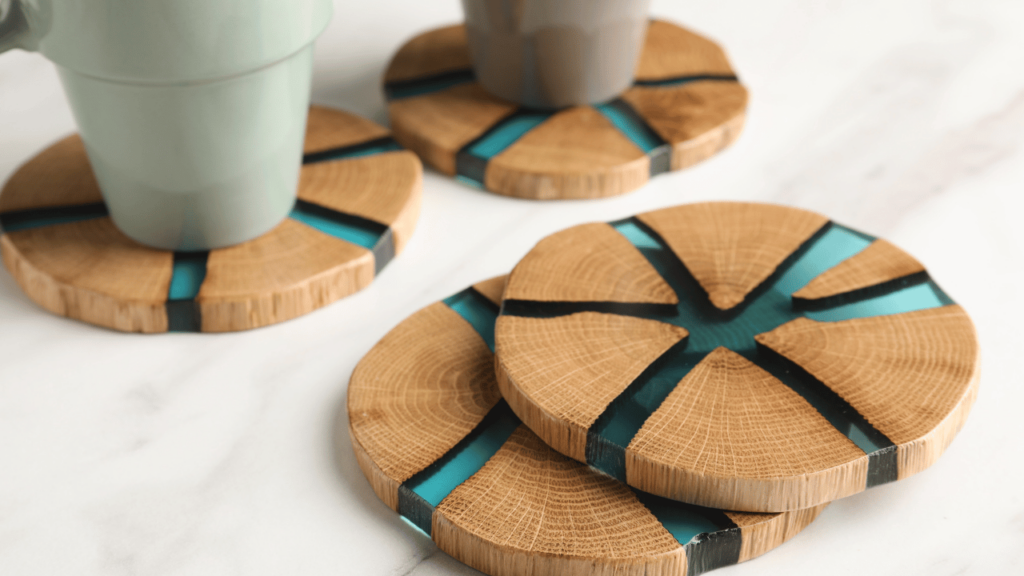
Have you ever wanted to turn simple pieces of wood into something beautiful and functional? Hand-carving wooden coasters is the perfect hobby for seniors—it’s creative, relaxing, and rewarding. Whether you’re crafting a set for your coffee table or a thoughtful gift for loved ones, this DIY project is easy to start. And remember, good health is the foundation of enjoying hobbies like this. That’s why SeniorHMOPPOplans.com is here to ensure you stay active and engaged in the things you love. Why Hand-Carving Wooden Coasters is a Great Hobby A Creative Outlet: Transform simple materials into unique, personalized designs. Relaxing and Therapeutic: Focused carving promotes calmness and mindfulness. Affordable and Accessible: Requires only a few basic tools and materials. A Meaningful Activity: Create something practical for yourself or as heartfelt gifts for family and friends. How to Create Hand-Carved Wooden Coasters Step 1: Gather Your Materials You don’t need much to get started: Small wooden discs or squares (available at craft stores or online). A beginner’s carving tool set. Sandpaper (fine-grit). Optional: Wood stain, paint, and a clear sealant for finishing. Step 2: Prepare Your Workspace Choose a well-lit, comfortable area to work. Place a non-slip mat or cloth under your materials to keep them steady. Step 3: Sketch Your Design Use a pencil to draw a simple design on each coaster. Popular choices include: Geometric patterns. Floral motifs. Personal initials or meaningful symbols. Step 4: Start Carving Using your carving tools, trace over the pencil design. Begin with light, shallow cuts and deepen them gradually. Take your time—this is a relaxing process. Step 5: Add the Finishing Touches Smooth the edges and surface with sandpaper. Apply wood stain or paint for a polished look. Seal the coasters with a clear finish to protect them from moisture. Tips for Success Start Simple: Choose softwood and easy designs for your first project. Practice First: Use scrap wood to get comfortable with your tools. Keep Safety in Mind: Use carving tools with finger guards for added protection. FAQs 1. Do I need expensive tools? No, an affordable beginner carving kit is perfect for starting out. 2. How long does it take to carve one coaster? Depending on the design, each coaster takes about 1–2 hours to complete. 3. Is this hobby safe for beginners? Absolutely! With proper tools and a steady workspace, anyone can enjoy carving safely. Personal Story: Sam’s Creative Journey At 64, Sam wanted a hobby that combined creativity and relaxation. He started carving wooden coasters as gifts for his grandchildren. “The joy on their faces when they saw their names carved into the coasters was priceless,” he says. Hobbies like this keep Sam engaged and connected with his family. And thanks to his Medicare Advantage plan from SeniorHMOPPOplans.com, he’s able to stay healthy and enjoy every moment of it. Why Your Health Matters Crafting hobbies like this bring joy and fulfillment, but staying healthy is the key to enjoying them to the fullest. SeniorHMOPPOplans.com helps you find the best health plans to keep you active and focused on what you love. Visit SeniorSearching.com for more inspiring ideas and practical tips. Call-to-Action Ready to carve your first wooden coaster? Visit SeniorSearching.com for more step-by-step guides and creative projects designed just for seniors.
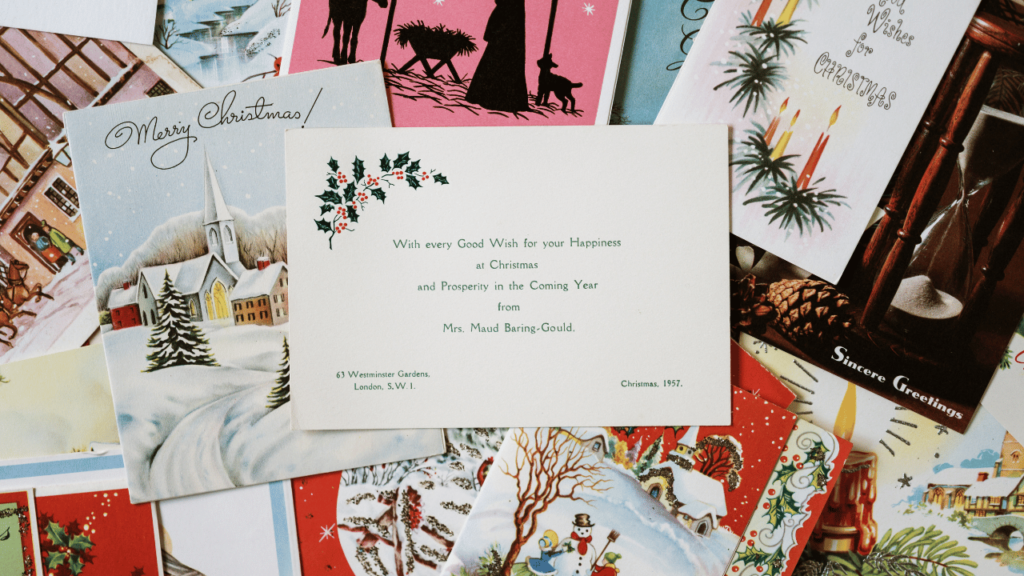
Preserve Your Legacy: How to Organize Family Heirlooms into a Memory Display

Family heirlooms are more than just objects—they’re treasures filled with memories and stories. Organizing them into a memory display is a meaningful way to honor your family’s history while adding a personal touch to your home. Sponsored by SeniorHMOPPOplans.com, this guide will help you turn cherished keepsakes into a beautiful display. For more creative ideas tailored to seniors, visit SeniorSearching.com! Step 1: Gather Your Heirlooms Start by collecting items that hold sentimental value, such as: Vintage photographs. Jewelry or watches passed down through generations. Old letters, postcards, or family recipes. Decorative items like vases, figurines, or textiles. Sort the items into categories (e.g., photos, documents, objects) to make organizing easier. Step 2: Choose a Display Method Decide how you want to showcase your heirlooms: Shadow Boxes: Perfect for combining small objects and photos. Gallery Walls: Use picture frames and shelves for a dynamic arrangement. Display Cabinets: Ideal for larger items like dishes or collectibles. Scrapbooks: Combine photos and written stories for a portable memory collection. Step 3: Tell a Story Arrange your items to create a narrative. For example: Highlight milestones, such as weddings or anniversaries. Dedicate sections to different family members or generations. Include labels or captions to explain the significance of each item. Step 4: Add Personal Touches Incorporate creative elements to enhance your display: Use decorative backdrops like patterned paper or fabric in shadow boxes. Add lighting, such as LED strips or fairy lights, to highlight the items. Include modern elements, like a digital photo frame displaying a slideshow of family images. Step 5: Maintain and Update Your Display Preserve your display for years to come: Clean glass surfaces and objects regularly. Rotate items occasionally to prevent fading or wear. Document the stories behind each heirloom so future generations can appreciate their meaning. Conclusion: Creating a memory display is a heartfelt way to preserve your family’s legacy and share it with loved ones. Ready to get started? Visit SeniorSearching.com for more inspiring ideas. And remember, SeniorHMOPPOplans.com is here to support your health and happiness every step of the way!
Calm Your Mind and Create: Knitting Patterns for Beginners Over 60
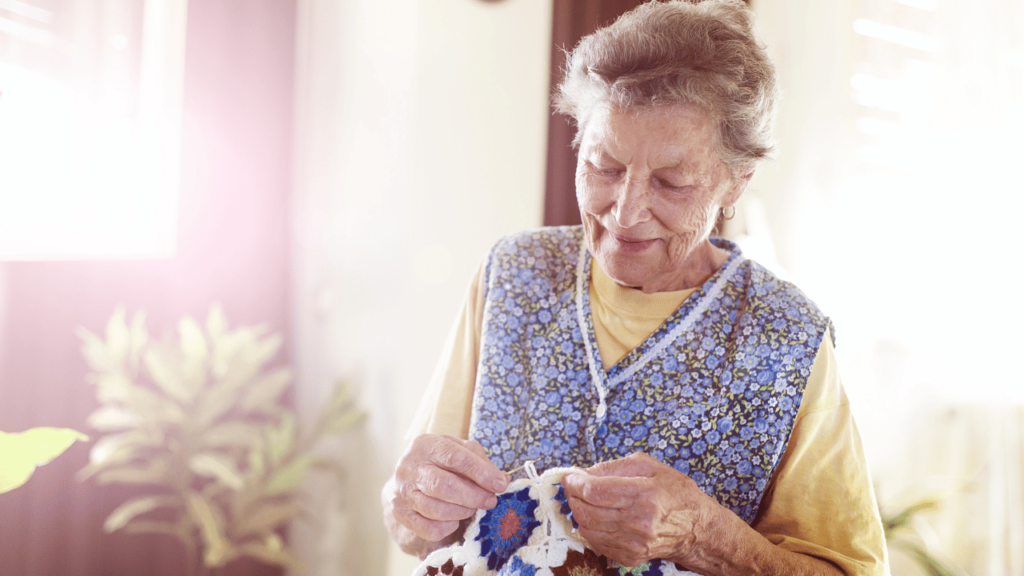
Knitting isn’t just a craft—it’s a calming, creative hobby that’s perfect for seniors. Whether you want to make cozy scarves or handmade gifts, knitting offers endless possibilities. Sponsored by SeniorHMOPPOplans.com, this guide will introduce you to simple knitting patterns perfect for beginners. Visit SeniorSearching.com for more inspiring ideas tailored just for seniors! Step 1: Gather Your Supplies Getting started is easy with just a few basic tools: Yarn: Choose medium-weight yarn in a soft texture and color you love. Knitting Needles: Size 8 or 9 is ideal for beginners. Scissors and Tape Measure: These are essential for measuring and cutting your yarn. Pattern or Guide: Start with a simple pattern like a scarf or dishcloth. Step 2: Learn the Basics Knitting begins with mastering a few foundational techniques: Cast On: This is how you start your project. It creates the foundation of stitches on your needles. Knit Stitch: The most basic and essential stitch, perfect for beginners. Bind Off: Finishes your project and keeps it from unraveling. You can find video tutorials online to practice these techniques. Step 3: Try These Beginner Patterns Start with these simple and rewarding projects: Garter Stitch Scarf: A classic project made entirely with the knit stitch. Choose a soft yarn for a cozy feel. Dishcloth: A small, quick project that helps you practice your skills. Baby Blanket: A slightly larger project that’s perfect as a thoughtful gift. Step 4: Join a Knitting Community Knitting is even more enjoyable when shared with others. Look for local knitting groups or join online communities to share tips, patterns, and progress. These groups are a great way to stay connected and inspired. Step 5: Relax and Enjoy Knitting is as much about the process as it is about the final product. Enjoy the meditative rhythm of each stitch, and don’t stress about perfection—every creation is unique. Conclusion: Knitting is a delightful way to stay creative and relaxed. Whether you’re crafting for yourself or making gifts for loved ones, it’s a hobby that brings joy. Ready to get started? Visit SeniorSearching.com for more inspiring ideas. And remember, SeniorHMOPPOplans.com is here to support your health and happiness every step of the way!
Add a Personal Touch: How to Create Handcrafted Greeting Cards
Are you looking for a creative and relaxing hobby? Making handcrafted greeting cards is a wonderful way to express yourself and brighten someone’s day. It’s a thoughtful and personal way to connect with loved ones while enjoying a calming activity. Sponsored by SeniorHMOPPOplans.com, this guide will help you design unique, heartfelt cards for any occasion. For more ideas tailored to seniors, visit SeniorSearching.com! Step 1: Gather Your Supplies Starting this hobby doesn’t require expensive tools. Here’s a basic list to get you going: Cardstock: Choose colors and patterns that fit the occasion. Scissors and Glue: Essential for cutting and assembling. Markers or Colored Pencils: Perfect for adding drawings or writing. Stickers, Stencils, or Stamps: These make decorating fun and easy. Optional: Ribbon, glitter, washi tape, or small embellishments for extra flair. Step 2: Choose Your Theme Think about the purpose of your card. Is it for a birthday, holiday, or just to say “thank you”? Tailor the design to fit the occasion and the recipient’s personality. Floral patterns, vibrant colors, or simple and elegant styles all work beautifully. Step 3: Plan Your Layout Before gluing anything, arrange your elements on the card. Start with a focal point, such as a cut-out heart or a stamped image, and build around it. Adding layers of paper or embellishments can create a 3D effect. Step 4: Add a Personal Message The magic of a handcrafted card lies in its personal touch. Write a heartfelt message inside. It could be as simple as “Thinking of you” or a longer note sharing your thoughts and feelings. Step 5: Embellish Your Card Use small embellishments like ribbons or stickers to make your card stand out. Remember, sometimes less is more—keep your design balanced and uncluttered. Step 6: Share Your Creation Once your card is finished, send it to a friend or family member. Receiving a handmade card can bring a smile and show just how much you care. Conclusion: Making handcrafted greeting cards is a creative and fulfilling way to connect with others. Whether it’s for a special occasion or just to let someone know you’re thinking of them, your unique touch makes all the difference. Ready to start crafting? Visit SeniorSearching.com for more ideas and inspiration. And remember, SeniorHMOplans.com is here to support your health and happiness for all your creative endeavors!