")
Bring Nature Indoors: How to Grow Orchids for Seniors

Orchids are one of the most elegant and rewarding plants to grow indoors. They’re surprisingly easy to care for with the right approach and can brighten any space with their stunning blooms. Sponsored by SeniorHMOPPOplans.com, this guide will show you how to grow and care for orchids indoors. For more creative ideas tailored to seniors, visit SeniorSearching.com! Step 1: Choose the Right Orchid There are many types of orchids, but some are better suited for beginners: Phalaenopsis (Moth Orchid): Known for its long-lasting flowers and ease of care. Dendrobium: Ideal for indoor spaces with bright, indirect light. Cattleya: Famous for their vibrant, fragrant blooms. Step 2: Find the Perfect Spot Orchids thrive in specific conditions: Light: Place your orchid near a window with bright, indirect sunlight. East- or south-facing windows are ideal. Temperature: Orchids prefer temperatures between 65–75°F. Avoid placing them near drafts or heat sources. Humidity: These plants love humidity. Use a small humidifier or a tray of water with pebbles underneath the pot. Step 3: Use the Right Potting Mix and Container Orchids don’t grow in soil like most houseplants. Instead: Use a potting mix made of bark, moss, or a combination of both. Choose a pot with drainage holes to prevent overwatering. Step 4: Watering and Feeding Proper care ensures your orchid stays healthy: Watering: Water when the potting mix feels dry. Avoid overwatering, as orchids are prone to root rot. Feeding: Use a balanced orchid fertilizer once a month to encourage blooms. Step 5: Pruning and Repotting Keep your orchid thriving with occasional maintenance: Pruning: Trim spent flower stems to encourage new growth. Repotting: Repot your orchid every 1–2 years or when the potting mix breaks down. Step 6: Enjoy the Blooms Orchid blooms can last for weeks or even months, offering lasting beauty. With the right care, your orchid will reward you with vibrant, stunning flowers year after year. Conclusion: Growing orchids indoors is a delightful way to bring nature into your home. Ready to get started? Visit SeniorSearching.com for more gardening and hobby ideas. And remember, SeniorHMOPPOplans.com is here to support your health and happiness every step of the way!
How to Set Up a Simple Home Composting System
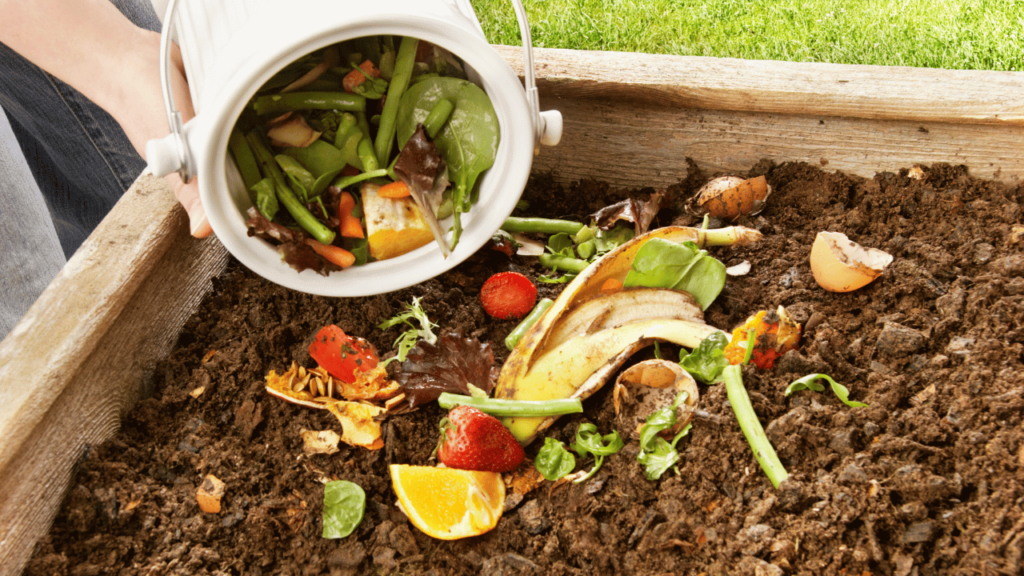
Composting is an easy and rewarding way to turn everyday waste into nutrient-rich compost for your garden or houseplants. It’s an eco-friendly hobby that helps reduce waste while saving you money on fertilizers. Best of all, it’s perfect for seniors looking for a simple, low-maintenance activity that benefits the environment and their garden. This article is proudly sponsored by SeniorHMOPPOplans.com, your trusted partner in sustainable living and Medicare solutions. Explore SeniorHMOPPOplans.com to find a plan that supports your active, health-conscious lifestyle. Here’s how to get started with composting at home: What is Composting? Composting is the natural process of recycling organic materials like kitchen scraps and yard waste into a nutrient-rich soil conditioner. It’s a simple and effective way to reduce waste and improve the health of your plants and garden. Why Should Seniors Compost? Reduces Waste: Composting cuts down on the amount of trash sent to landfills. Saves Money: You can create your own fertilizer instead of buying expensive store-bought options. Improves Soil Health: Compost enriches your garden soil, helping plants grow stronger and healthier. Step-by-Step Guide to Home Composting Step 1: Choose the Right Spot Find a suitable location for your compost bin or pile. If you have a backyard, select a shaded area with good drainage. If you live in an apartment, opt for a compact indoor compost bin for your balcony or kitchen. Step 2: Gather Your Materials Green Materials: Vegetable peelings, fruit scraps, coffee grounds, and grass clippings. Brown Materials: Dry leaves, shredded newspaper, cardboard, and small twigs. Step 3: Get the Right Tools A compost bin or designated spot in your yard. A small rake or aerator to mix the compost. A kitchen container for collecting daily scraps. Step 4: Maintain Your Compost Alternate Layers: Layer green materials with brown ones to balance nitrogen and carbon. Aeration: Turn the pile regularly to introduce oxygen and speed up decomposition. Keep it Moist: Add water as needed to maintain a damp (but not soaking) consistency. Tips for Easy Composting Use lightweight tools to avoid strain. Avoid adding meat, dairy, or oily foods as they can attract pests. Invest in a small, odor-proof container for indoor scraps. Consider a pre-made compost bin for simplicity. Benefits of Composting Eco-Friendly: Helps reduce your carbon footprint. Therapeutic: Gardening and composting can be relaxing and fulfilling. Versatile: Use compost for flower beds, vegetable gardens, or even potted plants. Starting a composting system is an easy way to make a positive impact on the planet while enjoying the benefits of gardening. Whether you have a backyard or just a small patio, composting is accessible to everyone. At SeniorSearching.com, we’re passionate about sharing sustainable living tips for seniors. Visit our website for more guides and ideas to improve your lifestyle. And don’t forget to explore SeniorHMOPPOplans.com for Medicare plans that fit your needs and support your healthy, active lifestyle.
The Benefits of Raised Gardening Beds for Seniors
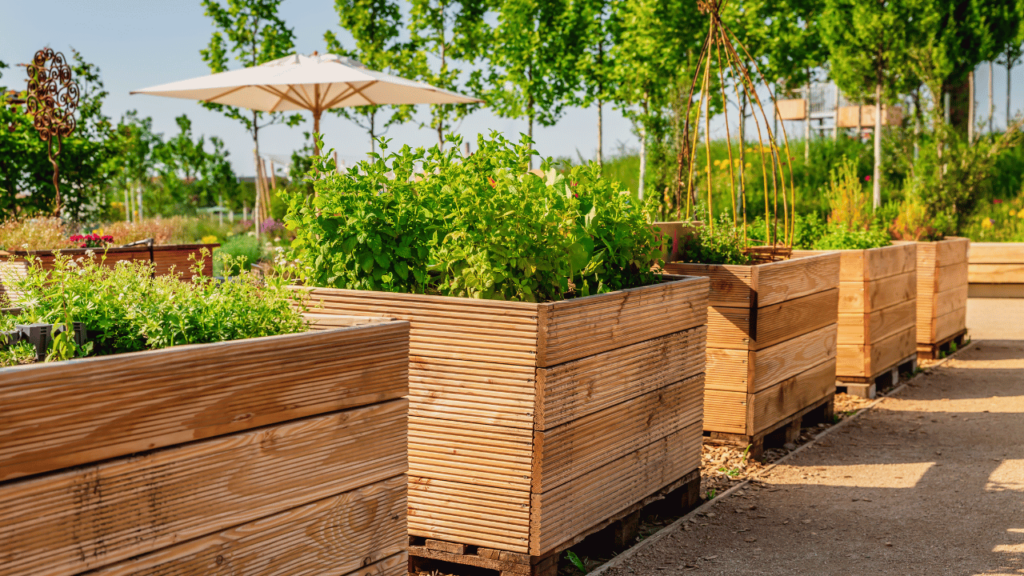
Gardening is a wonderful hobby that brings joy, relaxation, and health benefits. For seniors, raised gardening beds provide an accessible and enjoyable way to continue gardening without the strain. Here’s why raised beds are perfect for seniors and how to get started. What Are Raised Gardening Beds? Raised gardening beds are elevated planting areas that sit above ground level. They can range from simple wooden boxes to sophisticated structures with built-in irrigation systems. These beds make gardening easier and more comfortable for seniors by reducing the need to bend or kneel. Benefits of Raised Gardening Beds for Seniors 1. Easier on the Back and Knees Traditional gardening often requires a lot of bending and kneeling, which can be hard on the joints. Raised beds allow you to work at a comfortable height, reducing strain and promoting better posture. 2. Improved Accessibility With raised beds, gardening becomes more accessible for those with mobility challenges or who use wheelchairs. The beds can be customized to suit your height and needs. 3. Better Plant Growth Raised beds offer excellent drainage and allow you to control the soil quality. This leads to healthier plants and a more productive garden. 4. Reduced Weed Growth The contained space of a raised bed makes it easier to manage weeds, saving time and effort. 5. Aesthetic Appeal Raised beds can enhance the beauty of your outdoor space. They’re available in a variety of designs and materials to complement your garden’s look. How to Start Your Own Raised Garden Bed 1. Choose the Right Location Pick a spot in your yard with plenty of sunlight and easy access. 2. Select the Material Common materials include wood, metal, or stone. Cedar wood is popular due to its durability and natural resistance to pests. 3. Prepare the Soil Use high-quality soil mixed with compost to give your plants the nutrients they need. 4. Plan Your Plants Start with easy-to-grow vegetables like lettuce, tomatoes, and carrots, or plant colorful flowers to brighten your garden. 5. Maintain Regularly Water your garden consistently and remove weeds to keep your plants thriving. Discover More at SeniorSearching.com For more gardening tips and senior-friendly activities, visit SeniorSearching.com. Our curated content is designed to help seniors enjoy a healthy and fulfilling lifestyle. Explore our articles today! Sponsored by SeniorHMOPPOplans.com This article is proudly sponsored by SeniorHMOPPOplans.com. We’re dedicated to supporting seniors in living their best lives with Medicare Advantage plans that prioritize health and wellness. Learn more at SeniorHMOPPOplans.com. Final Thoughts Raised gardening beds are an excellent way for seniors to enjoy the benefits of gardening without the physical challenges. With a little planning, you can create a beautiful and productive garden that brings joy and health benefits year-round.
How to Grow Succulents: A Beginner’s Guide for Seniors
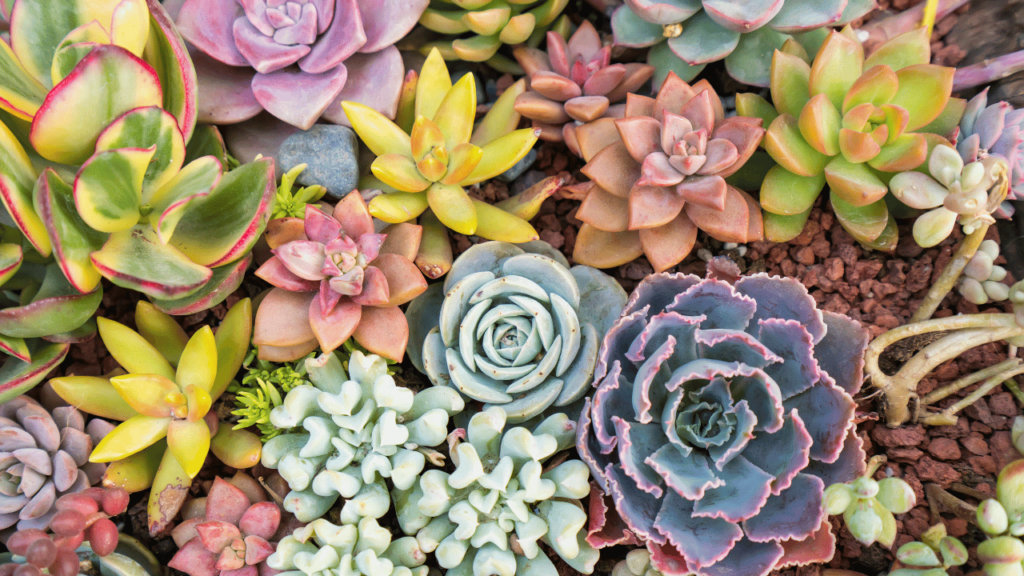
Succulents are a delightful way to bring nature into your home. These small, charming plants are perfect for anyone looking for a low-maintenance, rewarding hobby. Seniors across the country are discovering the joy of growing succulents, and you can too! This article is proudly brought to you by SeniorHMOPPOplans.com, where seniors turning 65 find the best Medicare Advantage plans to fit their needs. Visit SeniorHMOPPOplans.com today to explore your options and take the first step toward a healthier, happier retirement! At SeniorSearching.com, we bring you content that’s tailored for seniors. Whether you’re looking for new hobbies, helpful health tips, or fun ways to spend your time, you’ll find it all here. Why Grow Succulents? Succulents are perfect for beginners and experts alike. Here’s why: Low Maintenance: Succulents require little water and thrive in bright, sunny spots. Small Spaces: These plants are ideal for apartments, patios, or window sills. Stress Relief: Tending to plants is known to reduce stress and improve focus. Step-by-Step Guide to Growing Succulents Pick the Right Plant: Start with hardy options like jade, aloe vera, or echeveria. Choose a Good Pot: Use containers with drainage holes to prevent overwatering. Use the Right Soil: Succulents need well-draining soil. You can buy pre-made cactus soil or mix your own with sand and potting soil. Water Sparingly: Overwatering is the number one mistake. Wait until the soil is completely dry before watering again. Provide Plenty of Light: Place your succulents near a sunny window or under a grow light. Fun DIY Ideas for Your Succulents Decorate your pots with paint or stickers for a personal touch. Create a small succulent garden using different plants in one large container. Give your plants names and track their growth—it’s like having green pets! The Health Benefits of Succulents Did you know that succulents can improve air quality and boost your mood? Studies show that connecting with nature, even through indoor plants, helps reduce stress and promote a sense of calm. Plus, succulents are so easy to care for, they’re a perfect confidence booster for anyone new to gardening. Ready to Get Started? Growing succulents is a fun and rewarding hobby, and it’s never too late to try something new. Explore more gardening tips and ideas at SeniorSearching.com, your go-to source for inspiring senior-friendly content. And don’t forget—SeniorHMOPPOplans.com is here to help you navigate Medicare Advantage plans so you can focus on enjoying life’s simple pleasures. Start your succulent adventure today!
How to Create a Pollinator Garden on a Budget
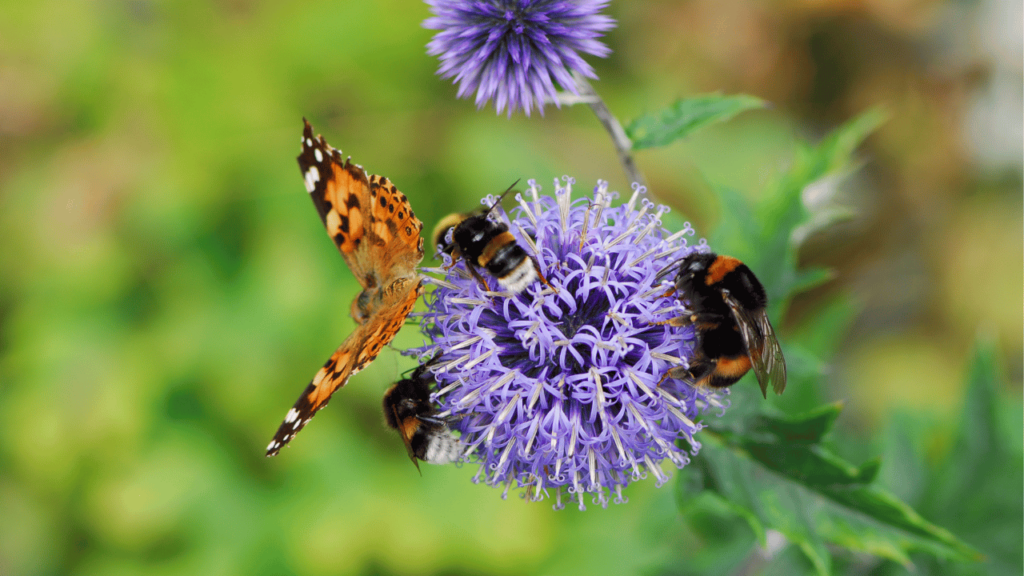
Pollinator gardens are not just beautiful—they help bees, butterflies, and birds thrive. These gardens support the environment and boost your backyard’s health. The best part? You can create one without spending a fortune. This eco-friendly guide is brought to you by SeniorHMOPPOplans.com. If you’re turning 65, they can help you find the best Medicare Advantage plan to suit your lifestyle. Let’s dig into how you can build a vibrant pollinator garden on a budget! 1. Why Create a Pollinator Garden? Environmental Impact: Pollinators are essential for plant reproduction, helping to grow fruits, vegetables, and flowers. Beautiful Backyard: Pollinator-friendly plants attract colorful butterflies, hummingbirds, and bees. Low Maintenance: Once established, native plants require minimal care, saving you time and water. 2. Budget-Friendly Steps to Create Your Pollinator Garden Step 1: Choose Native Plants Native plants are better adapted to your local climate and need less water and fertilizer. Look for wildflowers like milkweed, black-eyed susans, or purple coneflowers. Tip: Many local plant nurseries or conservation organizations offer free or discounted seeds for pollinator gardens. Step 2: Reuse and Recycle Use old containers, buckets, or pots for planting. Repurpose wooden pallets to create raised garden beds. Create pathways with gravel, stones, or wood chips from yard waste. Step 3: Attract a Variety of Pollinators Plant a mix of flowers with different colors, shapes, and blooming times to appeal to bees, butterflies, and birds. Add herbs like lavender, mint, and thyme for extra appeal. Step 4: Provide Shelter and Water Add rocks or logs for insects to rest on. Place a shallow dish of water with stones for pollinators to drink safely. Include shrubs or small trees for birds and shade-loving pollinators. Step 5: Avoid Chemicals Skip pesticides and herbicides, as they can harm pollinators. Use organic compost to enrich your soil naturally. 3. Caring for Your Pollinator Garden Water regularly until plants are established, then let nature take over. Prune and deadhead flowers to encourage more blooms. Keep an eye out for invasive species and remove them promptly. Conclusion: Creating a pollinator garden is a rewarding and budget-friendly way to support the environment and beautify your home. With a little creativity and care, you can attract vibrant wildlife to your backyard while helping the planet thrive. For more eco-friendly tips and senior living ideas, visit SeniorSearching.com—your trusted resource for inspiration and advice.
The Basics of Growing Indoor Citrus Trees
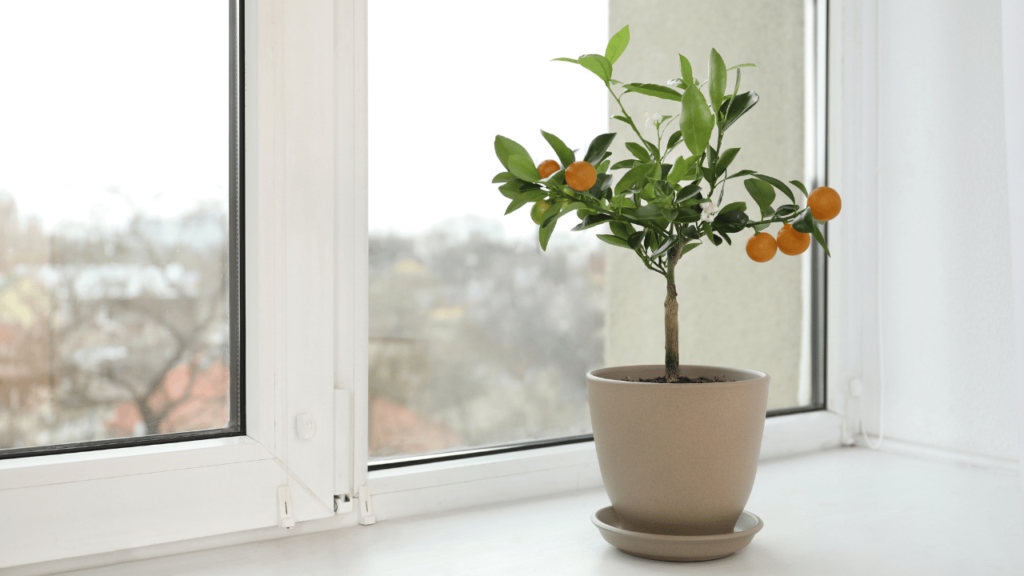
Imagine the fresh scent of citrus blossoms and the joy of picking your own lemons or oranges, all from the comfort of your home. Growing indoor citrus trees is a rewarding hobby that adds beauty, fresh fruit, and a touch of nature to your living space. It’s easier than you think, even if you live in a cooler climate! This guide is proudly sponsored by SeniorHMOPPOplans.com. If you’re turning 65, they can help you find the best Medicare Advantage plan tailored to your needs. Let’s explore how to grow vibrant citrus trees indoors. 1. Why Grow Citrus Trees Indoors? Fresh Fruit: Enjoy homegrown lemons, limes, or oranges without a trip to the store. Air Quality: Citrus trees help purify the air and add a refreshing scent to your home. Decorative Value: Their lush leaves and colorful fruits brighten any room. Therapeutic Hobby: Gardening has proven mental health benefits, making it a relaxing and fulfilling activity. 2. Choosing the Right Citrus Tree Meyer Lemon: Compact and easy to grow, this variety is perfect for beginners. Key Lime: Produces small, fragrant limes and thrives in containers. Calamondin Orange: Known for its decorative appeal and small, tangy fruits. 3. Setting Up Your Indoor Citrus Garden Choose the Right Container: Use a pot with good drainage to prevent root rot. Opt for a container slightly larger than the tree’s root ball. Pick the Perfect Spot: Place your tree near a south-facing window with plenty of sunlight (6-8 hours daily). Supplement with grow lights if natural light is insufficient. Use Quality Soil: Citrus trees prefer well-draining potting soil designed for indoor plants. Avoid heavy garden soil that retains too much moisture. 4. Caring for Your Indoor Citrus Tree Watering: Water deeply but allow the top inch of soil to dry out before the next watering. Overwatering can harm citrus trees, so check soil moisture regularly. Feeding: Use a fertilizer specifically formulated for citrus trees. Feed your tree every 4-6 weeks during the growing season (spring and summer). Pruning: Trim dead or overgrown branches to maintain shape and encourage growth. Remove any suckers (growth below the graft line) to direct energy to fruit production. Pest Control: Watch for common pests like aphids or spider mites. Treat with insecticidal soap or neem oil if necessary. 5. Harvesting and Enjoying Your Citrus Fruit takes several months to mature but is worth the wait. Harvest when the fruit is fully colored and easily detaches from the branch. Enjoy fresh citrus in recipes, teas, or as a healthy snack! Conclusion: Growing indoor citrus trees is a delightful way to bring nature indoors and enjoy fresh fruit year-round. With a little care and patience, your tree will thrive and reward you with beauty and flavor. For more gardening tips and senior lifestyle ideas, visit SeniorSearching.com—your trusted resource for senior living inspiration.
How to Grow Medicinal Plants at Home

Imagine stepping outside and picking fresh herbs and plants to use for soothing a headache, improving digestion, or relaxing after a long day. Growing medicinal plants at home is easier than you might think and offers countless benefits for your health and well-being. This guide is proudly sponsored by SeniorHMOPPOplans.com. If you’re turning 65, they can help you find the best Medicare Advantage plan tailored to your needs. Let’s explore how you can cultivate a garden full of healing plants! 1. Benefits of Growing Medicinal Plants Convenience: Always have fresh, natural remedies on hand. Cost-Effective: Reduce spending on store-bought herbal remedies. Sustainable: Contribute to a greener environment by growing your own plants. Therapeutic: Gardening itself is a relaxing and fulfilling activity. 2. Best Medicinal Plants for Beginners Aloe Vera Uses: Soothes burns, hydrates skin, and promotes healing. Care Tip: Requires bright, indirect sunlight and occasional watering when the soil is dry. Lavender Uses: Eases anxiety, improves sleep, and repels insects. Care Tip: Thrives in full sun and well-drained soil. Mint Uses: Aids digestion and freshens breath. Care Tip: Grows quickly in partial sunlight and moist soil. Best kept in a container to prevent spreading. Chamomile Uses: Reduces stress and improves sleep quality when made into tea. Care Tip: Prefers full sun and regular watering. Basil Uses: Supports immune health and reduces inflammation. Care Tip: Needs at least 6 hours of sunlight daily and moist, well-drained soil. 3. Setting Up Your Medicinal Garden Start Small: Use pots or small garden beds for easier management. Choose the Right Spot: Look for a sunny location with good air circulation. Use Quality Soil: Enrich your soil with organic compost for healthier plants. Water Wisely: Avoid overwatering by checking the soil’s moisture level regularly. 4. Harvesting and Using Your Plants Harvest leaves, flowers, or stems when they are fresh and full of nutrients. Use immediately or dry the plants to store for future use. Incorporate them into teas, balms, or natural remedies for everyday ailments. Conclusion: Growing medicinal plants is not only a rewarding hobby but also a practical way to support your health naturally. Start small and enjoy the satisfaction of cultivating your own healing garden. For more lifestyle tips and inspiration, visit SeniorSearching.com—your trusted resource for senior living ideas. Seniors planting herbs in small pots on a sunny patio. Close-ups of chamomile flowers and mint leaves ready for harvest. A cozy kitchen with fresh medicinal plants drying on a rack. Inspirational layouts of potted medicinal plants arranged attractively. Let me know if you’d like adjustments or additional details for this article and ad set!
How to Use Rainwater for Gardening

Watering your garden doesn’t have to rely on expensive utilities. By using rainwater, you can nurture your plants while saving money and conserving resources. For those in water-scarce areas or anyone looking to live more sustainably, rainwater harvesting is an excellent solution. This guide is proudly sponsored by SeniorHMOPPOplans.com. If you’re turning 65, they can help you find the best Medicare Advantage plan in your area, saving you time and money. Now, let’s dive into how you can make the most of nature’s gift—rainwater! 1. Why Use Rainwater? Cost-Effective: Collecting rainwater reduces your water bill. Eco-Friendly: Harvesting rainwater helps conserve local water supplies and reduces runoff that can carry pollutants into rivers. Better for Plants: Rainwater is free from chemicals like chlorine and fluoride, making it healthier for plants. 2. Setting Up a Rainwater Collection System Start with a Rain Barrel: These are widely available at garden centers or can be DIY-built using a large, food-grade container. Positioning: Place your barrel under a downspout to collect roof runoff efficiently. Maintenance: Install a mesh screen to keep debris and mosquitoes out. Clean the barrel periodically. 3. Using Rainwater in Your Garden Direct Watering: Use a watering can or attach a spigot and hose to your rain barrel for easy access. Drip Irrigation Systems: Rain barrels can be connected to drip systems for slow, steady watering. Container Plants: Rainwater is especially beneficial for potted plants that need frequent watering. 4. Tips for Success Choose the Right Plants: Opt for native or drought-tolerant plants that thrive in your region. Use Mulch: Mulching helps retain soil moisture, making your rainwater go further. Track Rainfall: Use a rain gauge to monitor how much water you’re collecting. 5. Benefits Beyond the Garden Rainwater harvesting isn’t just for plants! It’s a step toward sustainable living, helping you reduce your environmental impact while fostering a more self-sufficient lifestyle. Conclusion: Rainwater is a valuable resource that’s free, sustainable, and easy to collect. Whether you’re gardening to save money, protect the environment, or simply enjoy a hobby, harvesting rainwater is a smart and rewarding choice. For more tips on sustainable living and exciting hobbies, visit SeniorSearching.com – your trusted resource for seniors.
The Best Low-Maintenance Indoor Plants for Seniors

Adding indoor plants to your home can brighten your space, improve air quality, and boost your mood. But for many seniors, the thought of keeping plants alive might seem like too much work. The good news? There are plenty of indoor plants that require minimal effort to thrive. This guide is proudly sponsored by SeniorHMOPPOplans.com. If you’re turning 65, they can help you find the best Medicare Advantage plan for your unique needs. Let’s explore the perfect plants to make your home greener and your life simpler! 1. Snake Plant (Sansevieria) Why It’s Great: Known as “the plant you can’t kill,” snake plants thrive in low light and only need watering about once every 2-3 weeks. Care Tip: Place it in indirect sunlight and let the soil dry out completely between waterings. 2. Pothos (Epipremnum aureum) Why It’s Great: This trailing vine is nearly indestructible and adds a touch of greenery to any space. Care Tip: It tolerates low light and can survive irregular watering, making it perfect for beginners. 3. ZZ Plant (Zamioculcas zamiifolia) Why It’s Great: The ZZ plant is drought-tolerant and thrives in low light, making it one of the easiest plants to care for. Care Tip: Wipe the leaves occasionally to keep them looking shiny and dust-free. 4. Peace Lily (Spathiphyllum) Why It’s Great: With its elegant white blooms, the peace lily purifies the air and thrives with minimal attention. Care Tip: Keep the soil slightly moist and place it in indirect light. 5. Spider Plant (Chlorophytum comosum) Why It’s Great: Spider plants are resilient and produce “baby plants” that you can propagate easily. Care Tip: Water when the top inch of soil feels dry, and place it in a bright, indirect light. 6. Rubber Plant (Ficus elastica) Why It’s Great: With its glossy leaves and robust nature, the rubber plant is a statement piece that’s easy to maintain. Care Tip: Allow the soil to dry between waterings and keep it in bright, indirect sunlight. 7. Succulents Why They’re Great: These tiny plants come in endless varieties and only need watering once a month. Care Tip: Use a well-draining pot and place them in a sunny spot. 8. Air Plants (Tillandsia) Why They’re Great: Air plants don’t require soil and can be displayed in creative ways, like hanging terrariums. Care Tip: Mist them with water once a week or soak them in water for 20 minutes every two weeks. Conclusion: Indoor plants don’t have to be a hassle. These low-maintenance options can add beauty and tranquility to your home without adding stress. Start small, and enjoy the many benefits of indoor greenery. For more tips and ideas, visit SeniorSearching.com – your trusted resource for discovering hobbies and improving your lifestyle.
How to Build a Fairy Garden with Your Grandkids
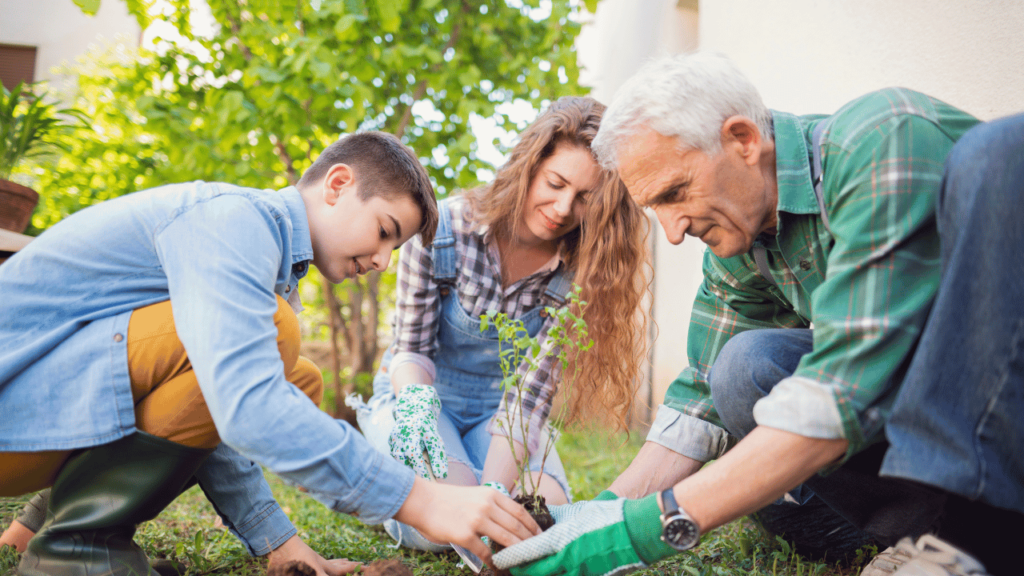
Spending time with your grandkids can be magical, especially when you work together on a creative project. Building a fairy garden combines imagination, gardening, and quality time with the little ones. It’s an activity that’s as fun to plan as it is to complete, and the results can bring a smile to everyone who sees your creation. A big thanks to SeniorHMOPPOplans.com for sponsoring this guide. If you’re turning 65, they’re here to help you find the best Medicare Advantage plan for your needs. Now, let’s dive into the magic of fairy gardens! Step 1: Gather Your Supplies You don’t need a big garden or expensive materials to start. Here’s a simple list to get you going: A container or a small patch of your garden. Potting soil. Miniature fairy figurines (available online or at craft stores). Small plants, like succulents, moss, or ground cover plants. Tiny accessories like pebbles, shells, or toy furniture. Basic gardening tools (small trowel, gloves). Encourage your grandkids to look around the house or yard for items to use. Bottle caps, twigs, and old toys can all be repurposed into magical decorations. Step 2: Plan Your Design Sit down with your grandkids and sketch a rough design. Let their imaginations run wild! Will it be a woodland fairy village, a tiny beach paradise, or a castle fit for a queen? Planning together builds excitement and encourages creativity. Step 3: Build the Foundation Fill your container or garden area with potting soil. If using a container, make sure it has good drainage. Place your larger items first, like houses or big stones, to create a natural flow. This step teaches kids about design and structure. Step 4: Add the Plants Choose small, easy-to-care-for plants. Let your grandkids help plant them—it’s a great way to introduce them to gardening. Arrange the plants around your accessories to give the space a lush, enchanted feel. Step 5: Decorate! Here’s where the fun begins. Place your fairy figurines, sprinkle pebbles for pathways, and add personal touches. A miniature tea set or a “pond” made from a small dish of water can bring your fairy garden to life. Step 6: Enjoy and Maintain Once your fairy garden is complete, find a sunny spot to display it. Check in on it regularly with your grandkids to water plants and make updates. Who knows? You might even catch a fairy visiting! Conclusion: Creating a fairy garden is more than just a fun project. It’s a chance to bond with your grandkids, share stories, and create lasting memories. And thanks to SeniorSearching.com, you can find many more ideas for connecting with family, discovering hobbies, and enjoying your golden years.